
Разборка ноутбука
Смотрим на петли дисплея с тыльной стороны и видим наклеенные заглушки – под ними болтики, которые тоже нужно выкрутить. Теперь открываем ноутбук и сдвигаем верхнюю панель над клавиатурой по направлению от себя. В моем случае эта панелька была пропитана соком по шву, так что пришлось приложить усилия, чтобы ее сдвинуть. Под панелью видим болты, удерживающие клавиатуру…откручиваем! Приподнимаем клавиатуру, откидываем ее от себя и аккуратно освобождаем шлейф клавиатуры. На тыльной стороне клавиатуры можем увидеть следы пыли – именно через отверстия в клавиатуре в данном ноутбуке идет забор воздуха, так что соки и чай лить нужно именно сюда, чтобы уж не мучиться, а просто выкинуть любимый ProBook. Я уже писал о том, к чему приводит небольшое залитие клавиатуры, так что решайте для себя сами, насколько близко к ноутбуку пить мокрые напитки. Откручиваем два болта, удерживающие нижнюю панель с тачпадом. Опять же, сок с витамином С, проникший в щели, усложняет задачу и добавляет матершины в голове. Сдвигаем нижнюю панель неторопливо, так как под ней есть шлейф тачпада.
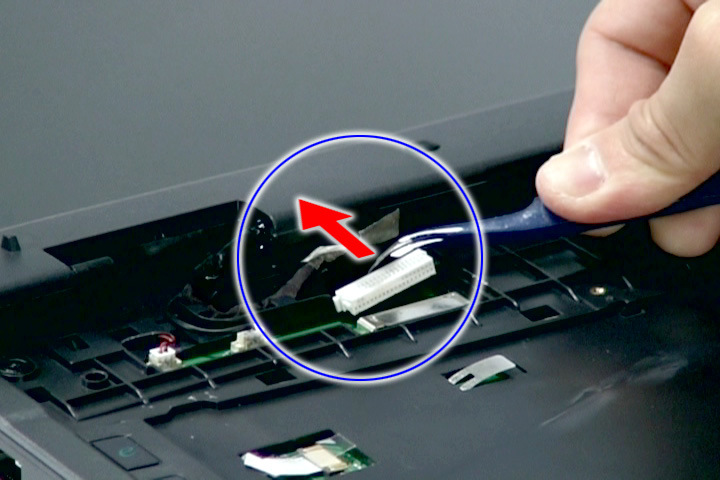
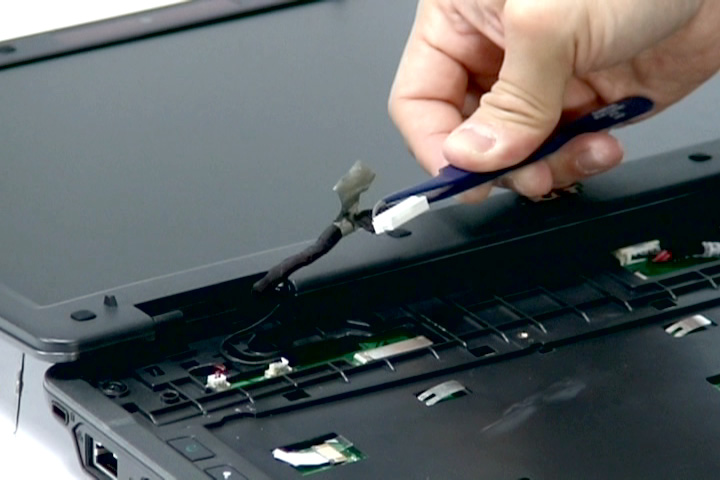
Отсоединяем шлейф тачпада
Теперь самое ответственное – откручиваем все зеленые и желтые болтики, указанные на фото и размыкаем контакты шлейфов, выделенных красным цветом. Для этого нам понадобится отвертка T8. Компания Hewlett Packard даже напоминает какую отвертку использовать и каких размеров установлены винтики. Обратите внимание, где производится заземление оплетки шлейфа дисплея. Поддеваем крышку по периметру чем-то неострым и снимаем ее
А под ней – не такая уж и большая плата…если нужно, вынимаем память, адаптеры модема 56K и Wi-Fi.
Enabling Microphone Access for Applications on Windows
Sometimes, microphone-related issues on an HP laptop may be due to incorrect application settings. Ensure that your applications have the necessary permissions to access the microphone. Here’s how you can enable microphone access for applications on Windows:
- Go to the Windows Start menu and open the “Settings” app by clicking on the gear icon.
- In the Settings app, select the “Privacy” option.
- In the left sidebar, choose “Microphone.”
- On the right side of the window, you will see a toggle switch labeled “Allow apps to access your microphone.” Ensure that this toggle switch is turned on.
- Scroll down to “Choose which apps can access your microphone.” Make sure the apps you want to use with the microphone are listed here and that the corresponding toggle switches are turned on. If an app you need is not listed, you can toggle on the option that says “Allow desktop apps to access your microphone.”
- Close the Settings app and open the application you want to use with the microphone.
- Check the application’s audio settings to ensure that the microphone is selected as the input device. Consult the application’s documentation or support resources if you are unsure how to access these settings.
By enabling microphone access for applications and verifying the input settings within the specific application, you can ensure that the microphone is available and functioning correctly while using those applications.
Adjusting the Microphone Levels
Properly adjusting the microphone levels can help improve the audio quality and resolve issues with low or no sound. Follow these steps to adjust the microphone levels on your HP laptop:
- Right-click on the speaker icon in the taskbar and select “Recording devices” from the menu to open the Sound settings window.
- In the Sound settings window, locate your microphone in the list of recording devices and double-click on it to open the properties dialog box.
- Switch to the “Levels” tab, where you will see a slider to adjust the microphone volume. Move the slider to increase or decrease the volume as needed. It is essential to find the right balance where you can be heard clearly without any distortion.
- While adjusting the microphone levels, speak into the microphone and monitor the sound levels shown in the Sound settings window. This will help you find the optimal volume level.
- Next, check if there is a microphone boost option available. If so, you can enable it to amplify the microphone input. Be cautious while using this feature as it can introduce background noise or distortion in some cases.
- Click “OK” to save the changes and exit the properties dialog box.
After adjusting the microphone levels, test it by speaking into the microphone and analyzing the sound quality. If the sound is clear and at an appropriate volume, the microphone levels have been successfully adjusted. If the issue persists, try the next troubleshooting steps to fix the microphone on your HP laptop.
How come my microphone is not working?
Where is microphone button on HP laptop?
The microphone is located on the top of the display next to the webcam which lets it pick up sound easily.
- Right-click the “Speaker” icon by the clock on the computer’s taskbar.
- Right-click the menu box and a pop-up box will appear.
- Right-click “Integrated microphone” and click “Enable” to turn on the microphone.
How do I test if my microphone is working?
To test a microphone that has already been installed:
- Make sure your microphone is connected to your PC.
- Select Start > Settings > System > Sound.
- In Sound settings, go to Input and under Test your microphone, look for the blue bar that rises and falls as you speak into your microphone.
Why my laptop mic is not working?
At the bottom-right corner of your laptop screen, right-click on the “Audio” icon. Now choose, “Open Sound Settings”. This will open sound settings of your Windows PC. Then, scroll down and you will see “Test your microphone” option and below it you will find the “Troubleshoot”.
Как найти микрофон на ноутбуке
Если вы не знаете, где находится микрофон на вашем ноутбуке, наши следующие 8 пошаговых методов помогут вам быстро его найти.
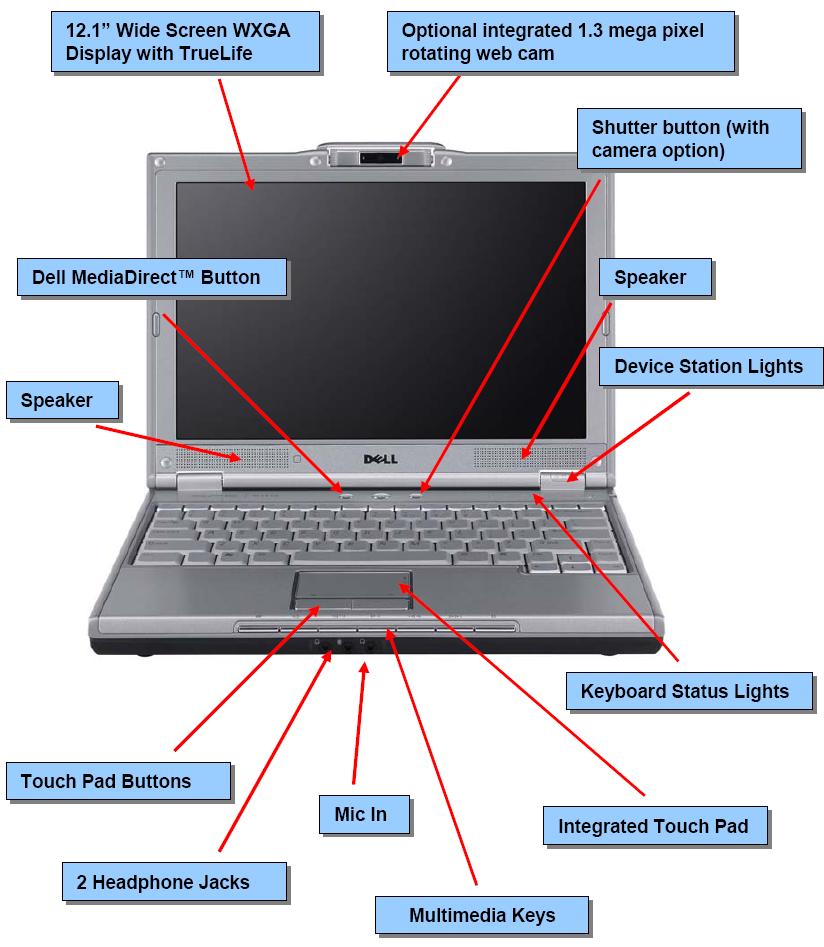
Способ № 1: поиск микрофона на ноутбуке Dell
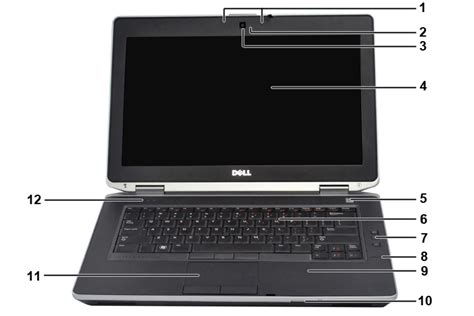
Если у вас есть ноутбук Dell серии Inspiron, микрофон расположен рядом с камерой в форме крошечного отверстия, отмеченного цифрой 1 на изображении ниже.
В некоторых моделях Inspiron два микрофона расположены по обе стороны от камеры. Серия Dell XPS поставляется с двумя или четырьмя микрофонами, которые можно увидеть на передней или боковой панели.
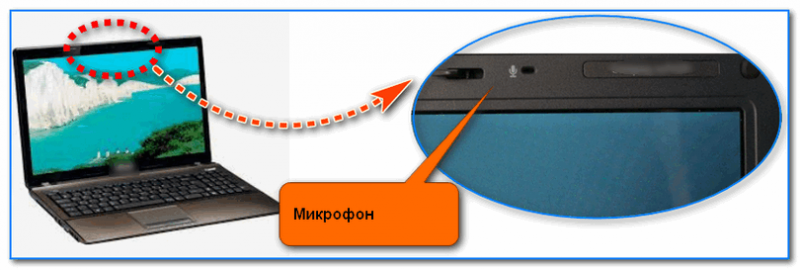
Способ № 2: поиск микрофона на ноутбуке Dynabook Toshiba
Ноутбук Dynabook Toshiba имеет два сдвоенных микрофона в виде двух крошечных отверстий, которые видны, когда вы открываете крышку и видите камеру по обе стороны. Некоторые ноутбуки Toshiba поставляются с одним микрофоном, который расположен на нижней панели ЖК-дисплея рядом с петлями и помечен как «микрофон».
Способ №3: поиск микрофона на ноутбуке Sony
Если вам интересно, где находятся микрофоны на вашем ноутбуке Sony VAIO, то они находятся в верхней части панели дисплея в виде двух маленьких точек рядом с камерой.
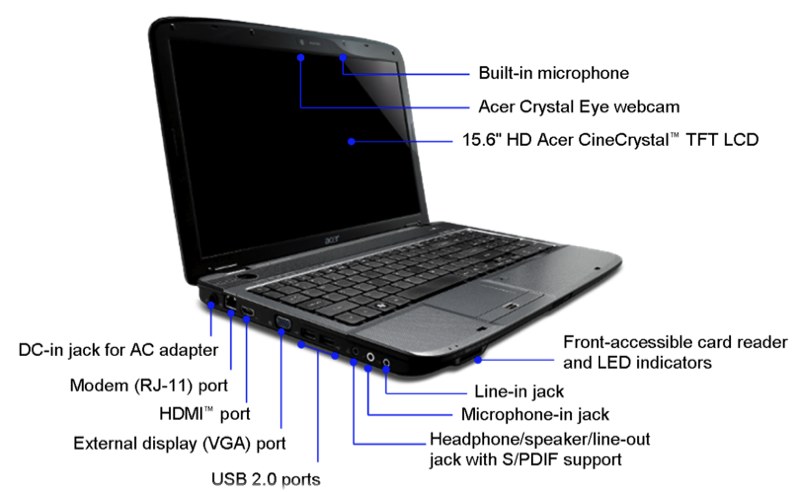
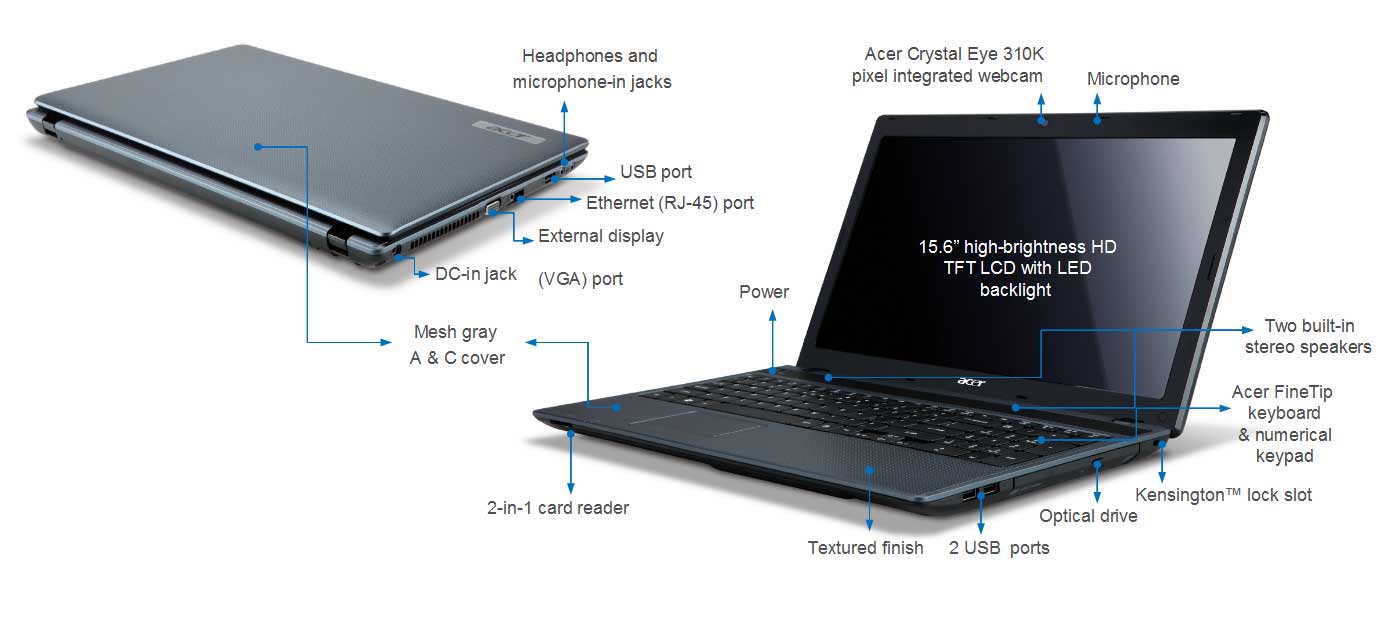
Способ № 4: поиск микрофона на ноутбуке Acer
Линейка ноутбуков Acer состоит из множества моделей, таких как серия Aspire, Swift 3, Chromebook, Predator, Nitro 5, Spin 5, ConceptD 7 и многие другие. Большинство из них оснащены двойными микрофонами, расположенными прямо над их экранами.
Тем не менее, есть много сообщений о том, что хотя эти микрофоны отлично подходят для видеозвонков, им не хватает качественной записи звука для бизнеса.
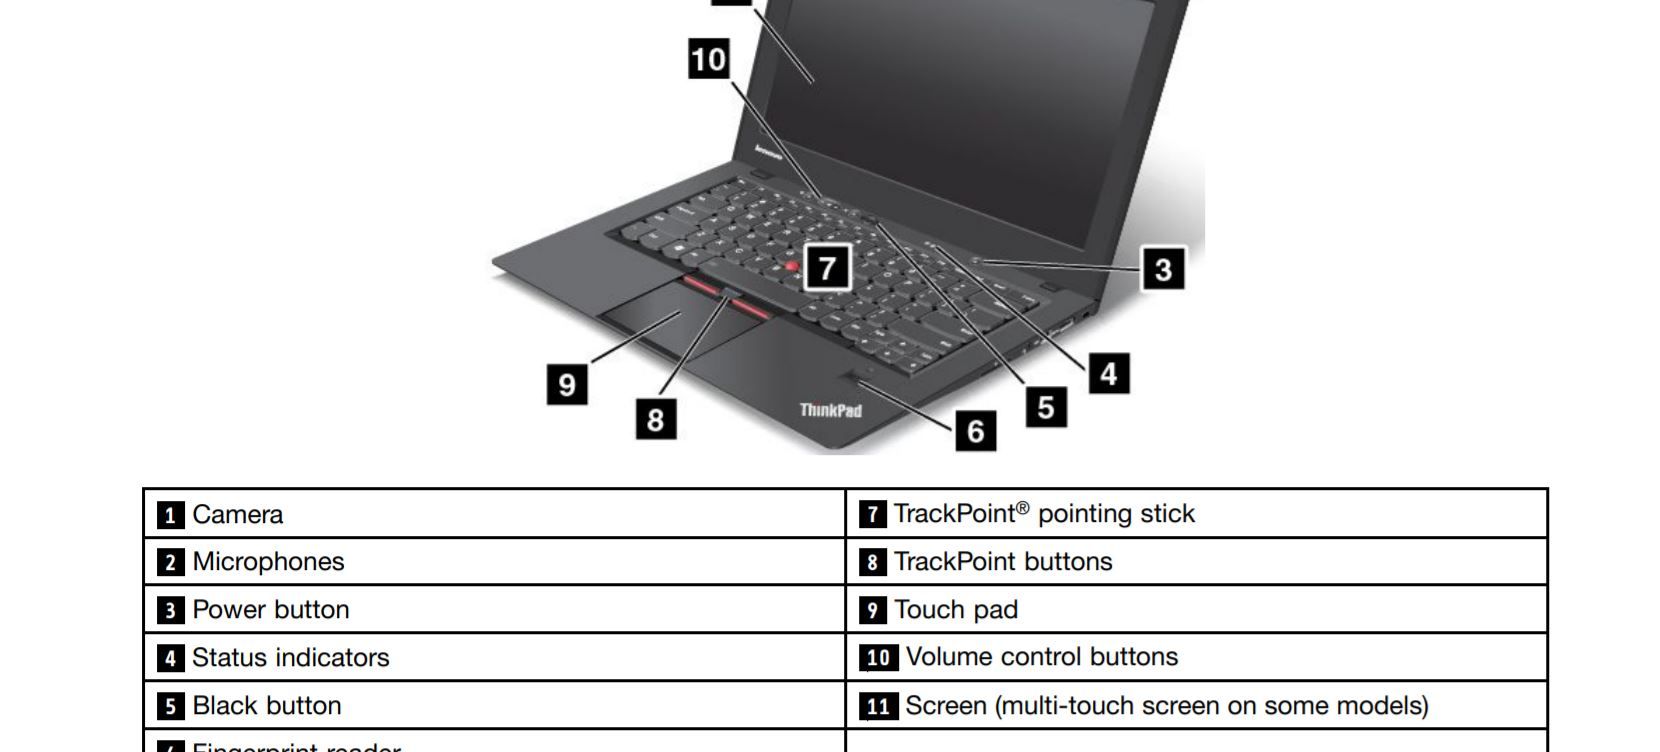
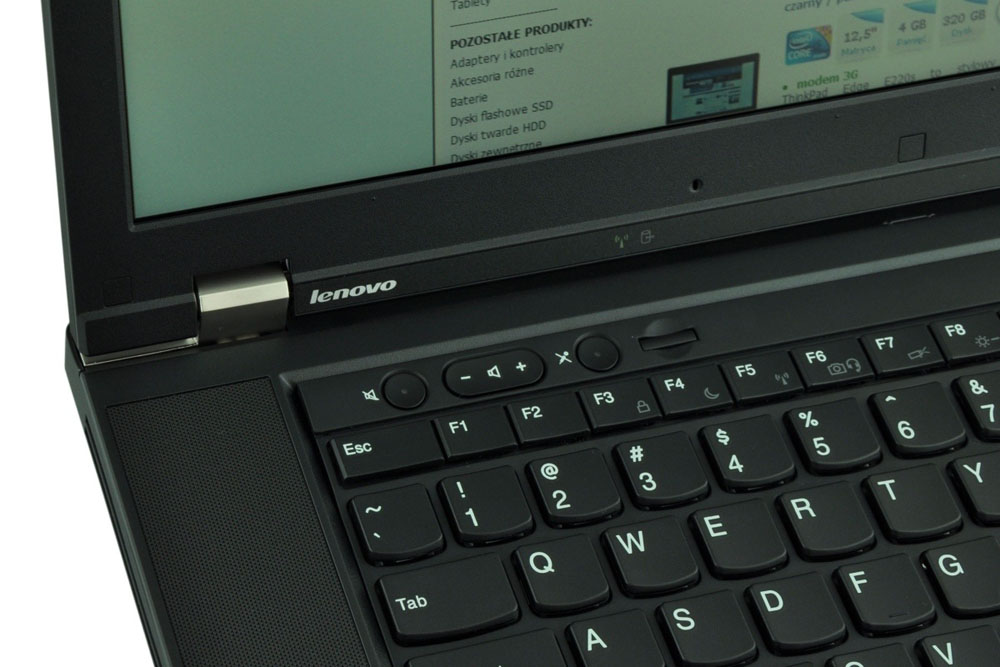
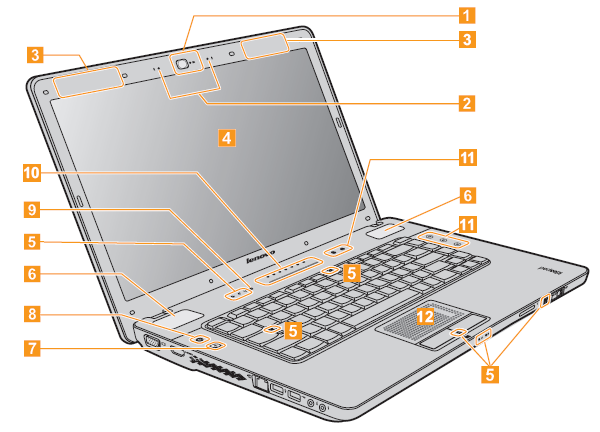
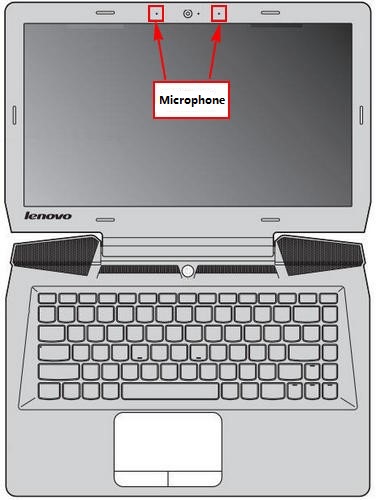
Способ № 5: поиск микрофона на ноутбуке Lenovo
Возможные места расположения встроенных микрофонов на ноутбуке Lenovo следующие.
- В верхней части экрана, рядом со встроенной камерой.
- По краям ЖК-экрана над местом расположения камеры.
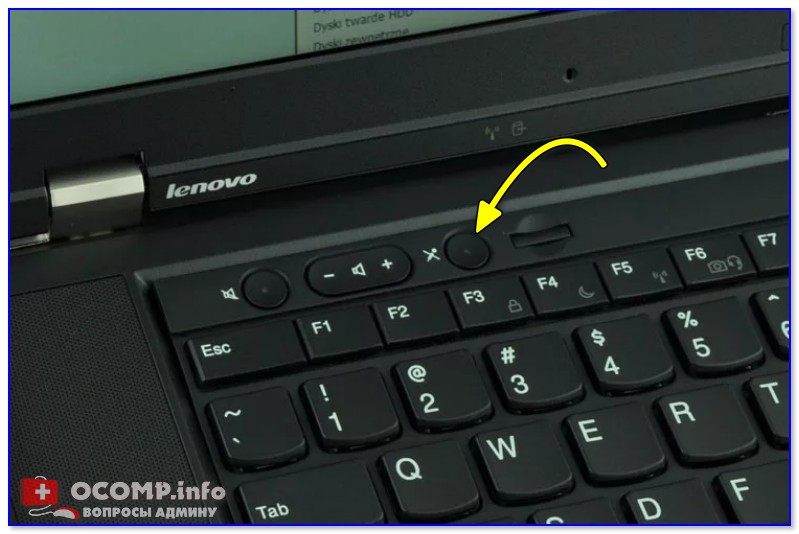
- Над клавиатурой или под правым шарниром дисплея.
- Слева или справа под клавиатурой.
- На левой нижней передней панели.
- На правой нижней задней панели рядом с кнопкой питания.
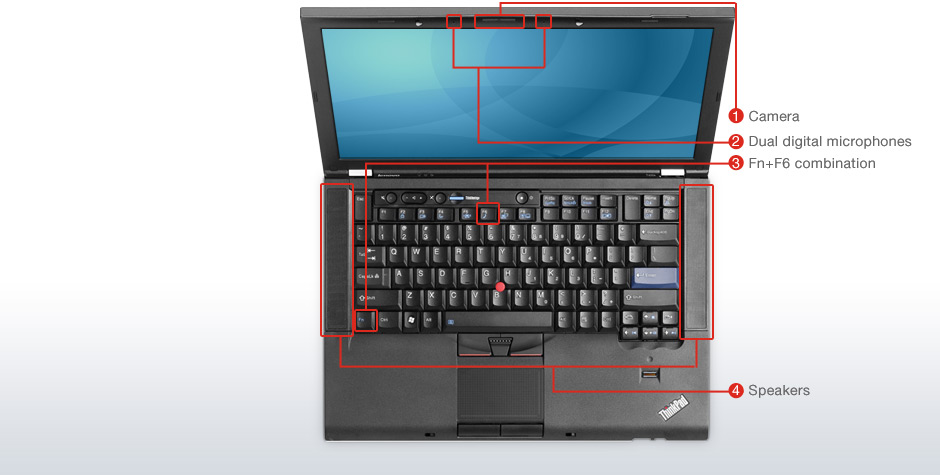
Способ № 6: поиск микрофона на ноутбуке HP
Большинство ноутбуков HP имеют один или несколько микрофонов, встроенных в верхнюю часть экрана рядом со встроенной веб-камерой, обозначенной цифрой 2 на рисунке ниже.
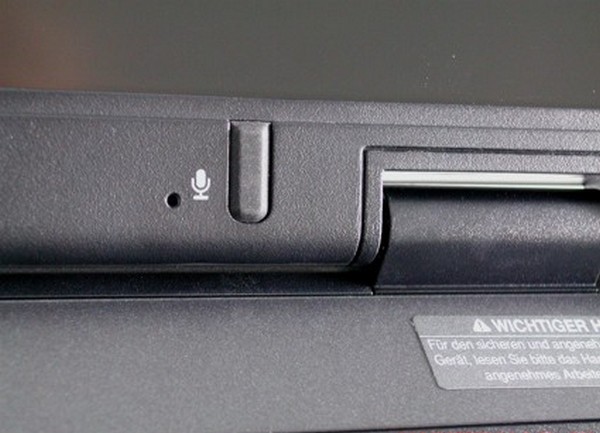
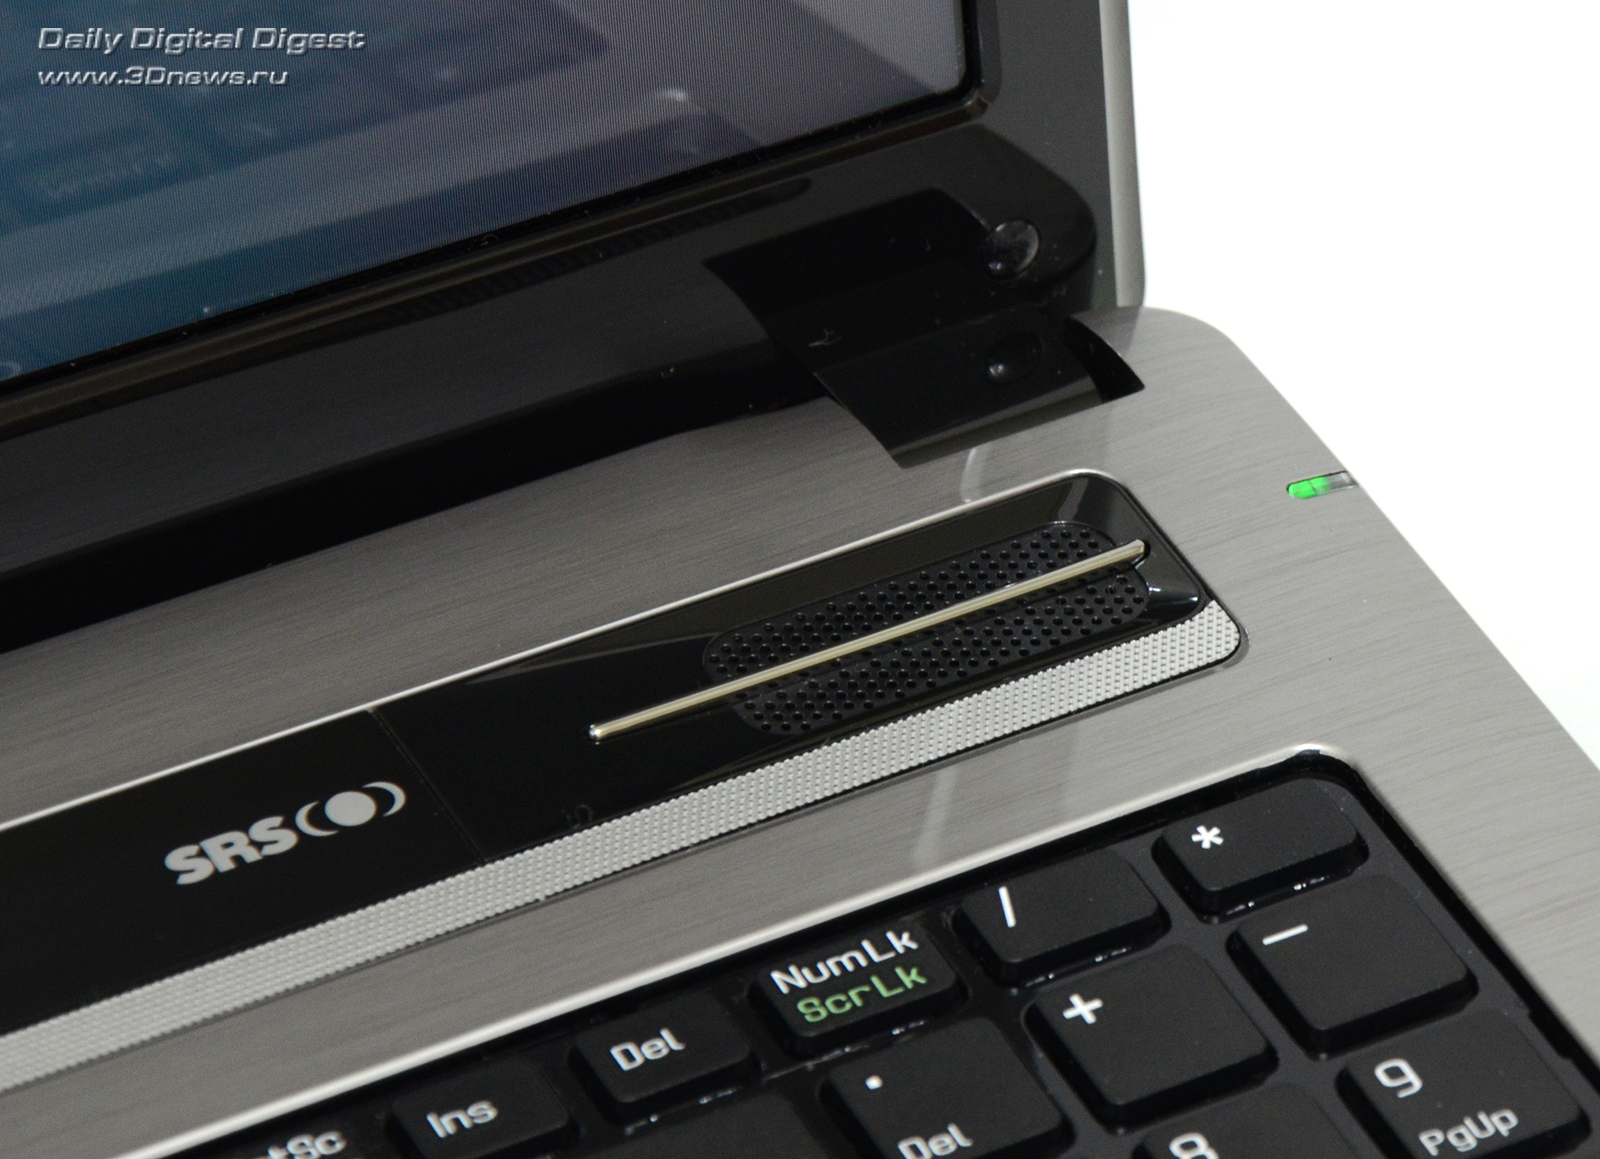
Однако на некоторых моделях HP вы можете найти один микрофон над клавиатурой в виде небольшого отверстия.
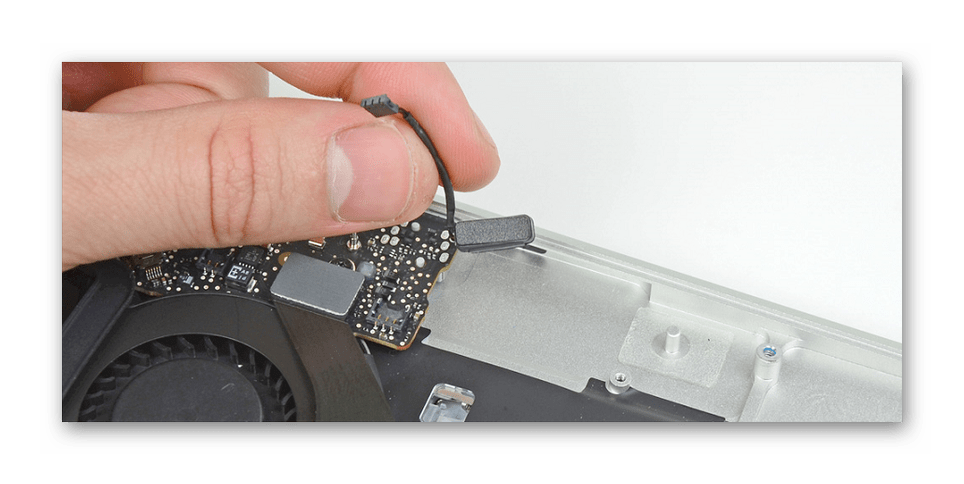
Способ № 7: найти микрофон на MacBook
Если у вас более старый Macbook Air, вы можете найти его микрофон на левой панели корпуса рядом с решетками динамиков. В более новых моделях микрофон спрятан за решетками динамиков, поэтому лучше не закрывать эту сторону устройства во время видеозвонка.

Новые модели MacBook Pro оснащены тремя встроенными микрофонами, расположенными в верхней правой части клавиатуры и динамика.
MacBook Pro 2017 года и более ранние модели не имеют решеток динамиков, поэтому микрофон встроен над клавишей ESC в нижней левой части корпуса.
Способ № 8: поиск микрофона на Chromebook
Многие ведущие бренды ноутбуков создают Chromebook для своих пользователей, но часто не знают, где находится их микрофон. Обычно он находится рядом с веб-камерой на панели над дисплеем, независимо от производителя. Микрофон обозначен цифрой 2 на следующем рисунке.
Результаты поиска микрофона в ноутбуке HP Pavilion
Нашли ли мы микрофон?
После детального исследования ноутбука HP Pavilion мы можем с уверенностью сказать, что микрофон в нем присутствует.
Мы обнаружили его в верхней части экрана, вблизи веб-камеры. Было не просто заметить микрофон, так как он скрытый практически невооруженным глазом и имеет очень компактный размер.
Как убедиться в его работоспособности?
Чтобы убедиться, что микрофон в ноутбуке HP Pavilion работает правильно, можно воспользоваться встроенной программой Windows «Запись звука».
Необходимо открыть программу и записать небольшую аудиофайл тестового разговора. После записи необходимо проиграть файл и проверить, какую именно звуковую информацию удастся прослушать.
Если воспроизведение было успешным и звук был полностью слышен, значит, микрофон ноутбука HP Pavilion работает исправно.
Why does my microphone get very noisy?
Many users have faced issues during the audio call or video call. Don’t worry I have a solution for it which will help you get out of the problem. These issues get evoked due to the background or ambient noises. Here are some methods to minimize the interferences.
Here the settings will be the same for all windows systems i.e windows 7, 8,10 which is efficient on all. You just need to follow some steps manually.
- Go to the control panel by searching in the search bar.
- Open hardware and sound.
- For example, you could find the microphone bar under sound > recording.
- Then, click the microphone.
- Go to properties.
- As on-screen instruction, search for the level tab in the window.
- Go for the boost tool under the microphone.
- Make a roll, i.e., upward and downward in the level on the microphone boost.
- If done, you can proceed to the tab name enhancements.
- As a tick box would appear, make sure the Noise suppression and Acoustic echo cancellation.
- You can test the audio, too, go back to the recording menu and search for listening to this device and click ok.
By performing these steps, you are ready to go back to your gaming,meetings !
How do I fix the microphone on my laptop?
How to Fix a Laptop Microphone That Doesn’t Work
- Open the Control Panel.
- Click Hardware and Sound.
- Click Sound.
- Click Recording.
- Right click your microphone, and click Properties.
- Click Levels.
- If the microphone icon has a crossed out red circle next to it, click it to unmute.
Why mic is not working in laptop?
Where do I find my microphone settings?
Go to a site that wants to use your microphone and camera.
…
Change a site’s camera & microphone permissions
- On your Android device, open the Chrome app .
- To the right of the address bar, tap More. Settings.
- Tap Site Settings.
- Tap Microphone or Camera.
- Tap to turn the microphone or camera on or off.
Can I plug microphone into headphone jack?
Most computers and laptops nowadays come with a single audio jack designed for both headphones and microphone use. This usually isn’t an issue considering that most wired headphones come with the standard 3.5mm TRRS plug ideal for integrated audio jacks.
Common Issues with the Microphone on an HP Laptop
Many HP laptop users experience issues with their microphone at some point. These problems can be frustrating, especially if you rely on your laptop for video conferencing, recording audio, or voice chatting. Fortunately, most microphone issues can be resolved with a few simple troubleshooting steps. In this section, we will discuss some common problems you may encounter with the microphone on your HP laptop and how to fix them.
One common issue is the microphone not being recognized by the laptop. This can happen due to a variety of reasons, including outdated audio drivers or incorrect microphone settings. Another common problem is low or no sound coming from the microphone, making it difficult for others to hear you during calls or recordings.
Another issue that users often face is background noise or distortion in the recorded audio. This can be caused by interference from other hardware or software, or it could be an issue with the microphone itself. Lastly, some users may experience an overall failure of the microphone, where it doesn’t work at all.
Whatever the specific issue you’re facing, the following sections will guide you through the necessary steps to resolve the problems and get your microphone working properly again.
Как получить доступ к настройкам микрофона на ноутбуке
Для того чтобы на ноутбуке необходимо сначала открыть окно с его настройками. Для этого нажмите правой кнопкой мышки по иконке динамика на панели задач и в открывшемся окне выберите пункт «Записывающие устройства».
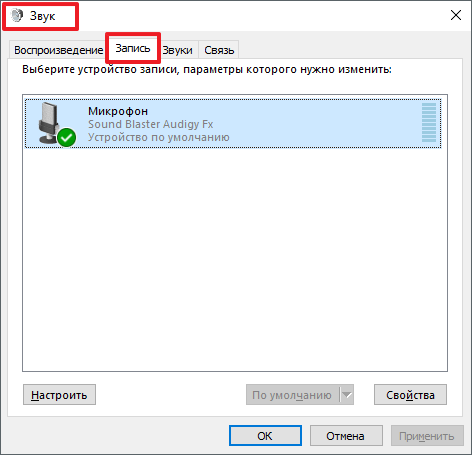
Кроме этого доступ к настройкам микрофона на ноутбуке можно получить и через «Панель задач». Для этого и перейдите в раздел «Оборудование и звук – Звук». После того как на экране появится окно «Звук», вам останется только перейти на вкладку «Запись».

В результате вышеописанных действий перед вами должно появиться окно «Звук», открытое на вкладке «Запись». С помощью этого окна можно изменить основные настройки вашего микрофона.
Ниже мы опишем, какие на ноутбуке можно изменить с помощью данного окна.
Как отключить или включить микрофон на ноутбуке
Первое, и самое простое, что можно сделать в окне «Звук», это включить или . Для того чтобы получить доступ к этой настройке вам необходимо кликнуть правой кнопкой мышки по иконке вашего микрофона и выбрать соответствующий пункт в появившемся меню.

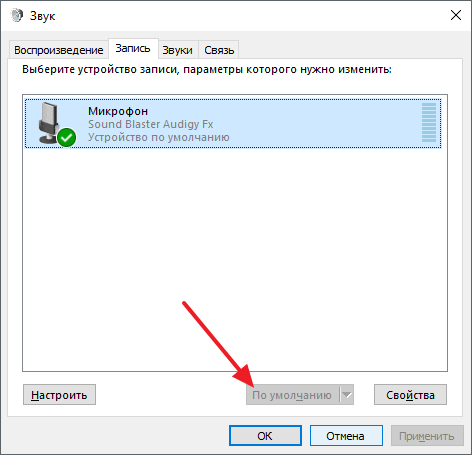
Как выбрать микрофон по умолчанию
Также здесь можно указать какой микрофон должен использоваться по умолчанию. Данная настройка будет полезна если к вашему компьютеру подключено сразу несколько микрофонов.
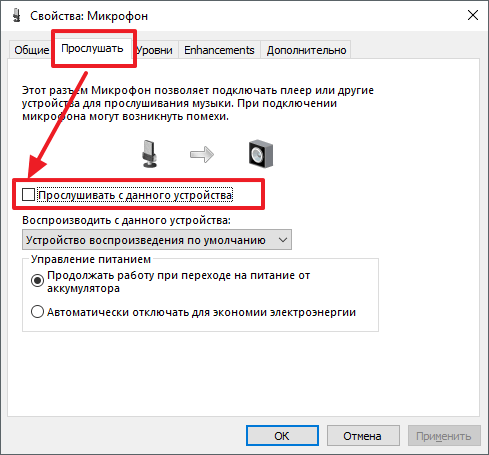
Как включить вывод звука с микрофона на колонки
Для того чтобы включить вывод звука с микрофона на колонки, а также получить доступ к остальным на ноутбуке вам необходимо выделить микрофон и нажать на кнопку «Свойства».

После этого откроется окно «Свойства микрофона». Здесь нужно перейти на вкладку «Прослушать» и включить там функцию «Прослушивать с данного устройства».
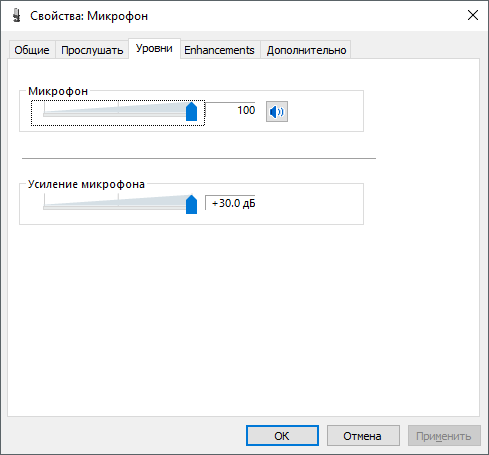
Как повысить громкость микрофона на ноутбуке
Для того чтобы на ноутбуке, в окне «Свойства микрофона» перейдите на вкладку «Уровни». Здесь будет доступно две функции: «Микрофон» и «Усиление микрофона». Увеличив значение данных функций, вы сможете повысить громкость звучания микрофона на вашем ноутбуке.
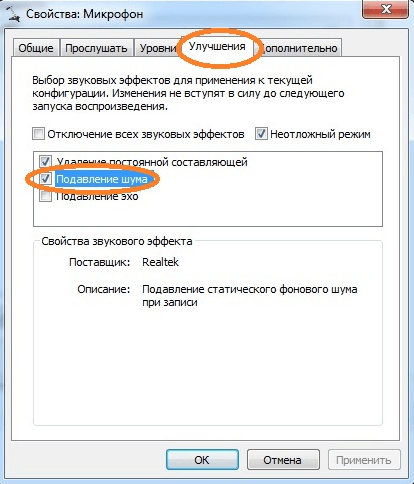
Как включить подавление шума на микрофоне
Для того чтобы включить подавление шума на микрофоне, а также другие улучшения звука, в свойствах микрофона перейдите на вкладку «Улучшения». Нужно отметить, что данные функции присутствуют в данной вкладке не всегда. Их наличие зависит от , которая используется на вашем ноутбуке.
Как изменить настройки частоты дискретизации и разрядности
При необходимости вы можете изменить настройки частоты дискретизации и разрядности для вашего микрофона. Это можно сделать в окне свойства микрофона на вкладке «Дополнительно».
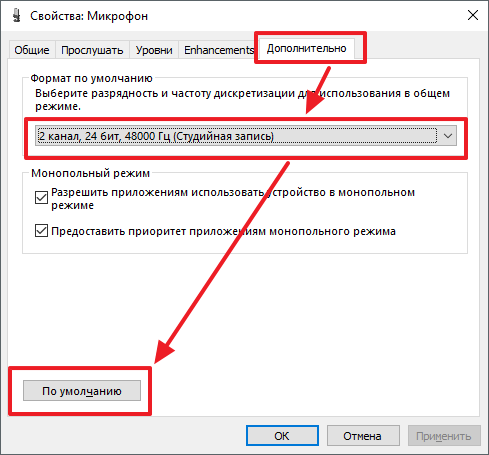
В случае, если установленные настройки частоты дискретизации и разрядности вам не подошли, вы можете вернуть стандартные значения нажав на кнопку «По умолчанию».
Сегодня практически все ноутбуки lenovo, asus, acer, hp, hp pavilion dv6 или toshiba имеют встроенные микрофоны. Это удобно – можно делать записи и разговаривать.
Вот только чтобы этим удобством воспользоваться нужно знать не только где находится микрофон в ноутбуке, но и как его настроить и включить.
Расположен микрофон у всех в одном и том же месте. Настройка и включение также одинаковое – оно зависит больше от установленной операционной системы, чем от модели ноута.
Ниже на рисунке можно увидеть, где в ноутбуке находиться микрофон. Он расположен в самом верху экрана по центру.
why my mic just randomly stopped working?
This problem can be due to the inbuilt microphone disabling itself during any work. to make sure it works I have mentioned the steps on pages 2-3 above. Hence, I will guide you to overcome this error as there are different options you can try updating the driver mentioned above.
If it still doesn’t work, there are alternative ways i.e., you can download driver fix software(https://www.driverfix.com/) or restore pc repair tool(https://www.restoro.com/). You can also reset the window audio service to enable the microphone to follow the given steps:


- Go to the Search bar located at the left bottom, search for services.msc type by typing it into it, and double click to open Services.
- Search for the Windows Audio service in the on-screen window.
- If it’s not enabled, do the right-click and select the Start option in there, or If it’s enabled already, then right-click it and select Restart again.
- Wait for the system to finish the process and kindly make a restart the laptop.
This guide will make your microphone enabled …!
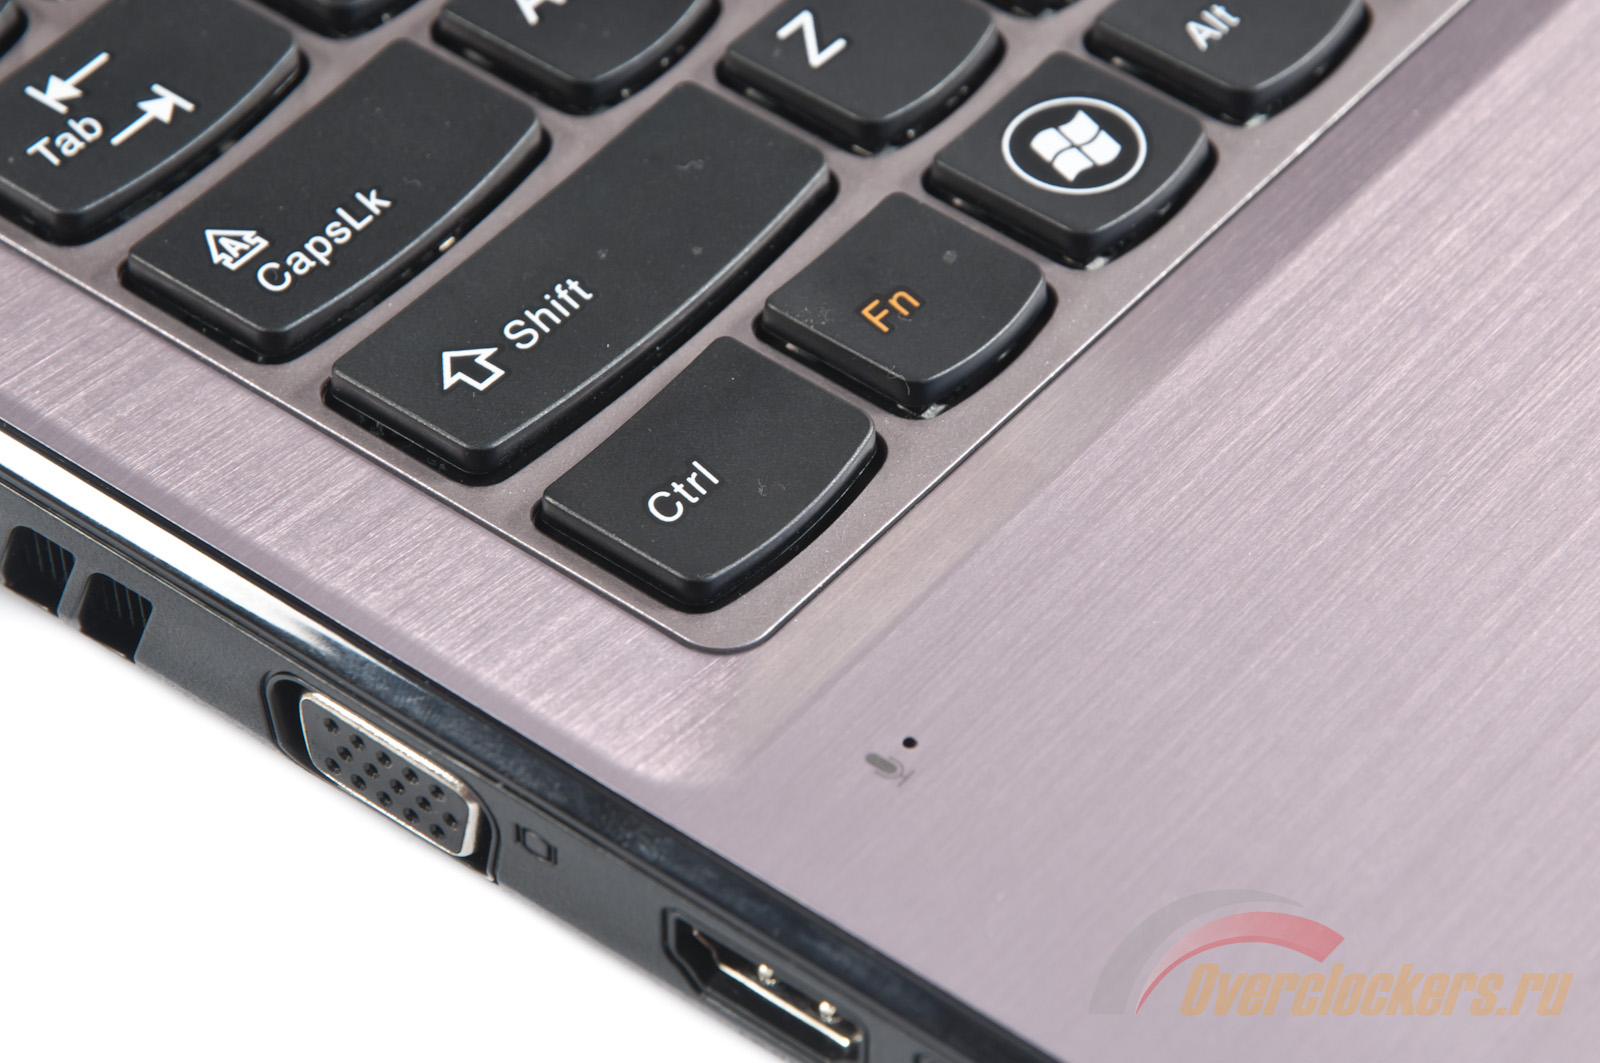
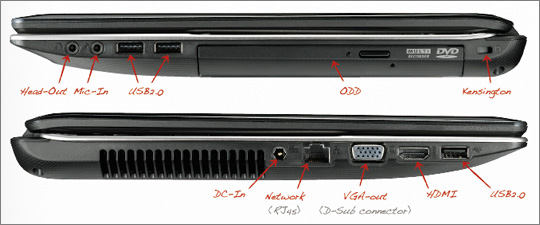
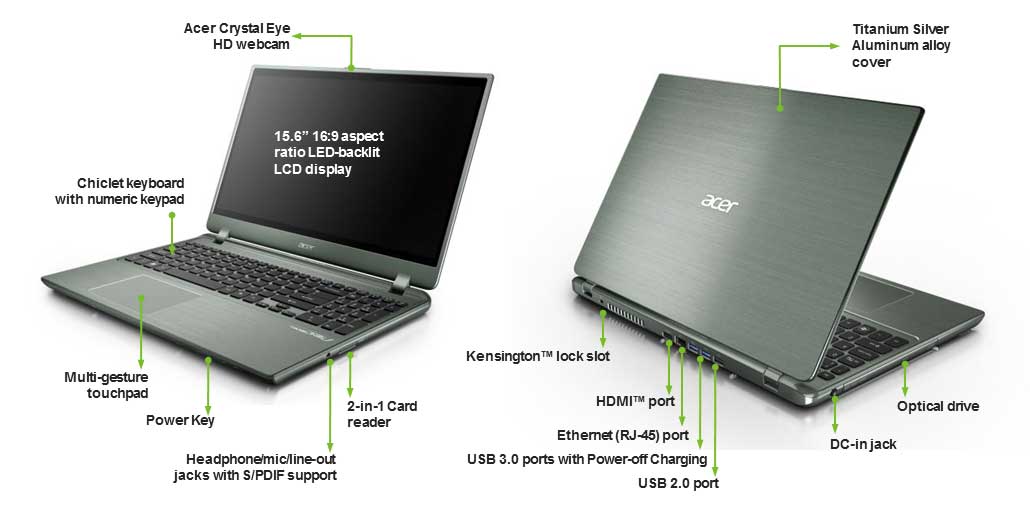
How to use External Microphone using the 3.5 mm audio jack?
For this, you can refer to the image above showing the right part of the laptop. The tag numbered “3” is been useful in this scenario. It’s an option for those whose inbuilt microphones can’t be worked though we have provided the solution for all issues out there.
This is used as an external mic. As mentioned, it Connects optional powered stereo speakers, headphones, earbuds, a headset, or a television audio cable. Also, it can connect to an optional headset microphone which one can use for voice calls, video calls, meetings. But is a drawback that this jack does not support optional standalone microphones to connect.
Using a 3.5mm jack cable is the second most option to use as it can be used as a microphone, too, so you don’t need to be worried if your inbuilt microphone stops responding. Though we have made a selection for the 3.5mm audio jack for you…!
Using a USB Microphone as an Alternative
If you are unable to resolve the microphone issues on your HP laptop using the previous troubleshooting methods, you may consider using a USB microphone as an alternative. USB microphones are external devices that connect directly to your laptop’s USB port, bypassing any potential issues with the built-in microphone. Here’s how you can use a USB microphone as an alternative:
- Purchase a USB microphone that is compatible with your HP laptop. USB microphones are widely available online and in electronics stores.
- Plug the USB microphone into an available USB port on your laptop. Windows should automatically recognize the device and install the necessary drivers.
- Once the USB microphone is connected, go to the sound settings on your laptop and select the USB microphone as the default recording device. This ensures that the laptop uses the USB microphone instead of the built-in one.
- Adjust the microphone levels and settings as necessary in the sound settings window. This ensures optimal performance and audio quality from the USB microphone.
- Open the application you want to use the microphone with and configure the input settings to use the USB microphone as the preferred audio input device.
- Test the USB microphone by speaking into it and checking the sound levels in the application or the sound settings window. If everything is working properly, you can rely on the USB microphone as an alternative to the built-in microphone.
Using a USB microphone as an alternative can be a viable solution if you are still experiencing issues with the built-in microphone on your HP laptop. USB microphones offer better audio quality, versatility, and ease of use, making them a popular choice for various applications such as video conferencing, voice recording, and gaming.
Why is my mic not working on my HP laptop?
Here are some of the reasons the HP laptop microphone is not working:
- Misconfigured permissions – If the problem is limited to an app, for instance, the HP laptop microphone is not working on Zoom, it could the app permissions to blame.
- Outdated, corrupt, or incompatible drivers – Issues with the driver, too, could lead to several problems with the microphone, and it’s usually the outdated drivers to blame.
- Incorrect sound settings – In case the microphone picks up feeble audio, chances are that your sound settings are misconfigured, and resetting the sound settings should do the trick.
- Hardware issue – Though rarely the case with an internal microphone, you can’t altogether rule out the possibility of a hardware malfunction.
Ищем микрофон на верхней панели ноутбука
Чтобы использовать микрофон в ноутбуке HP Pavilion, необходимо его сначала найти. Он может находиться на верхней панели ноутбука, рядом с веб-камерой, и обычно выглядит как маленькое отверстие.
Если вы не можете найти микрофон на верхней панели, проверьте в дополнительных настройках звукового устройства, может быть он не включен или настроен неверно. Вы также можете найти подробную инструкцию в руководстве пользователя для вашей модели ноутбука.
Не забудьте включить микрофон, прежде чем начинать записывать аудио или использовать его в видеочатах. В настройках звука устройства вы можете увидеть все доступные входы и выходы аудио и выбрать нужный вам.
Найдя микрофон, вы можете использовать его для записи голосовых заметок, голосового поиска, видеозвонков и многого другого.