
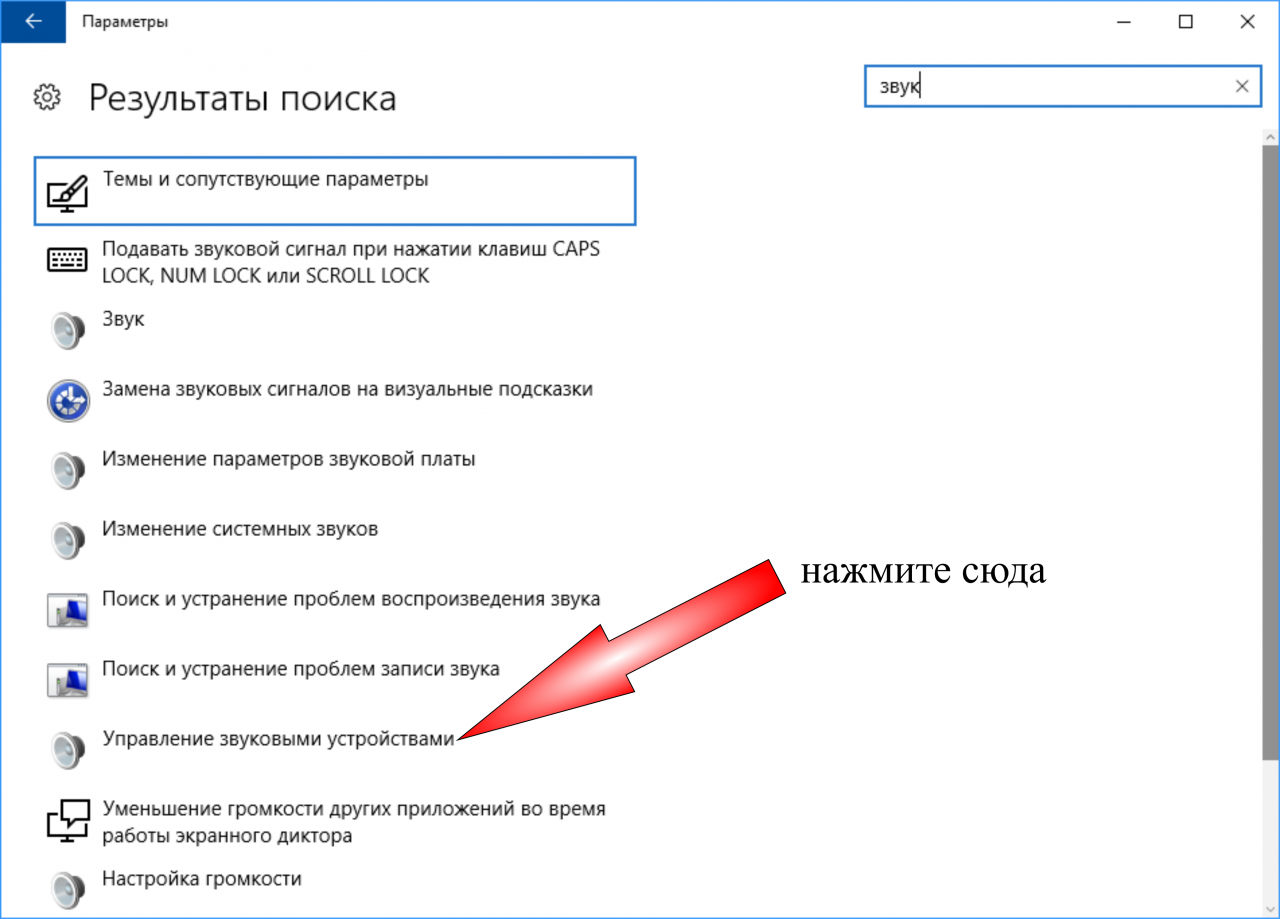
Dell monitor audio settings and debugging
1. Check the audio settings
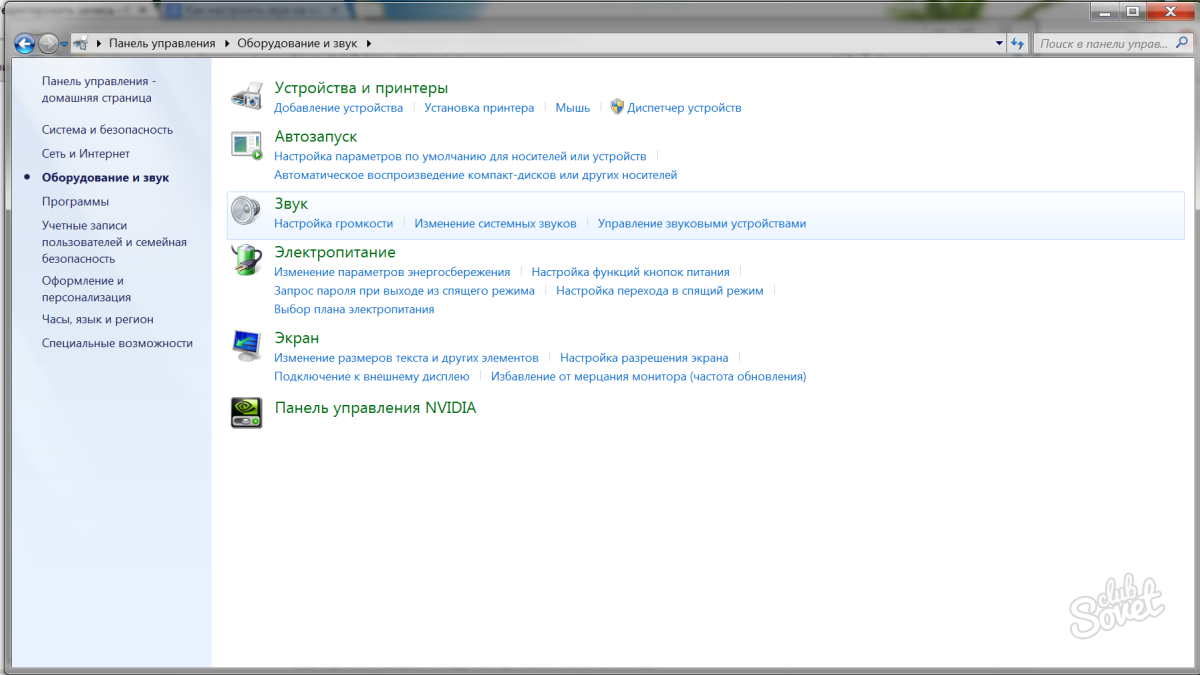
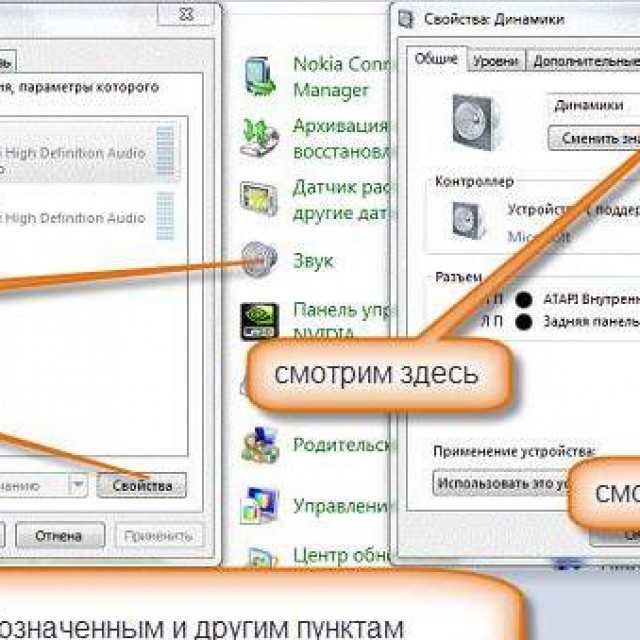
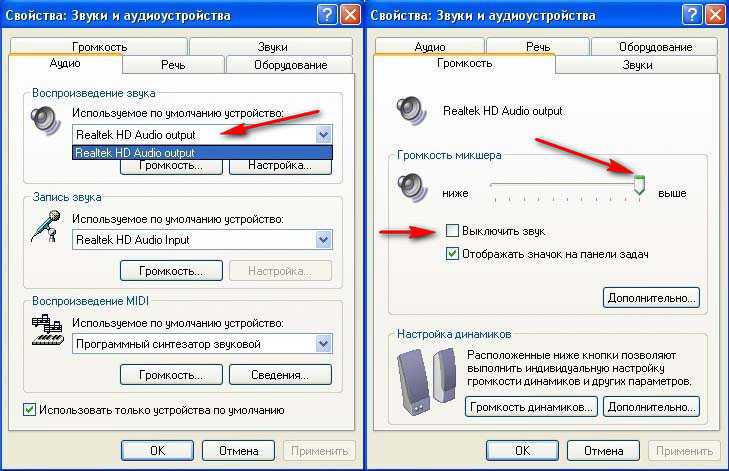
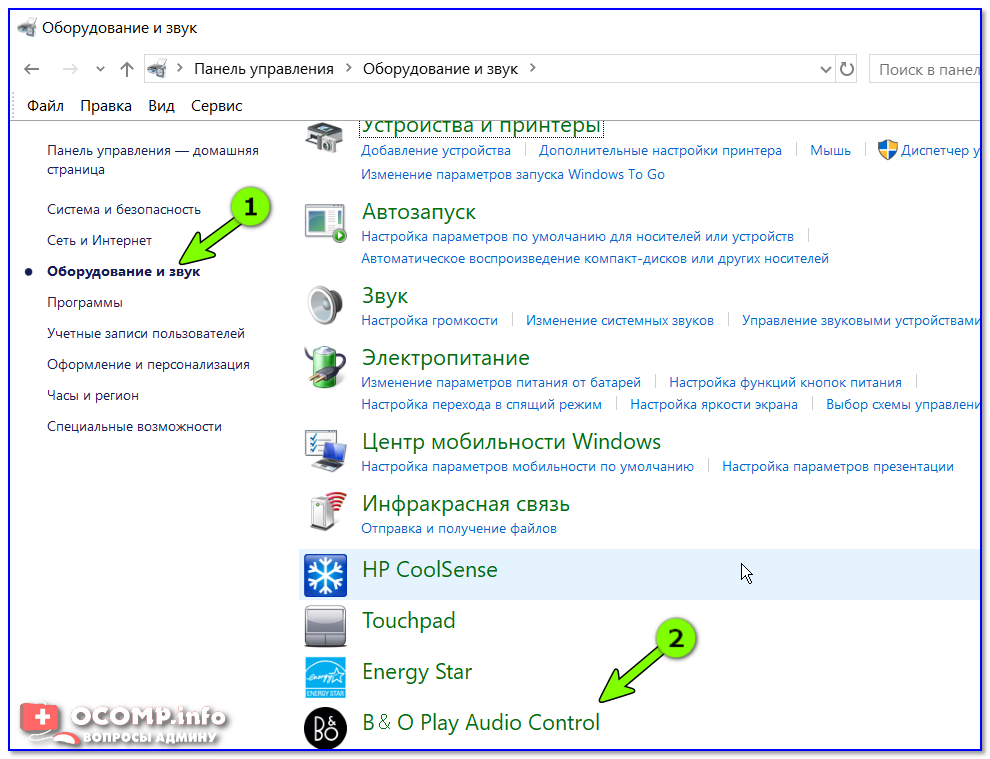
Sometimes the audio settings may be misconfigured. Open «Control Panel», enter «Sound» option, make sure the default playback device is selected correctly. If you have more than one audio output device, try to disable the other devices and keep the Dell monitor as the only output device.
2. Test different applications
Sometimes, specific applications may cause audio problems. Try playing audio in different applications, such as Windows Media Player, YouTube, Spotify, etc. to confirm if all applications are silent. If only a specific application is silent, check the audio settings for that application.
3. Using Windows Audio Troubleshooting
Windows comes with an Audio Troubleshooter that can help detect and fix common audio problems automatically. Right-click the volume icon in the lower-right corner of the taskbar, select «Troubleshoot Sound Problems» and follow the prompts.
Final Thoughts
Whether it’s Dell Latitude 7400, Inspiron 14, or Inspiron 15 series 5000 or 3000 – the above steps may get you sorted with Dell laptop headphone jack not working issue. But be prepared if any or all of them fail. The headphone jack or the port of the laptop may get physically damaged. Dust or insects can be stored and the physical connection may also get disrupted.
The truth is any number of reasons can cause problems. The sensible thing is to apply the processes described above before rushing to the mechanics or getting a shiny, new one.
We hope, unless the product is physically damaged, the methods we described will fix the issue.
More To Read:
How to Fix Dell Laptop Headphone Jack Is Not Working In Windows 7 & 8
Windows 10 is overwhelmingly used around the world these days, but some users still cling to Windows 7 & 8 for the simple & practical functions they offer. If you have Windows 7 or 8 OS running on your Dell laptop, carry on reading for the solution to solve the headphone issue.
Windows 7
Please follow the below steps:
- Just follow the easy steps below;
- Open Control Panel using WindowsStart menu and open Audio Manager
- Then select the small folder sign to find the text Analog.
- Click the “Disable Front Panel Jack Detection” to deselect.
- Press OK.
You should be ok now with the headphones.
Windows 8
- Go to the Loudspeaker sign at the bottom right and right-click it.
- Select Sound Manager and go to the Advanced tab and click on Jack sign.
- Press the button.
- Select Ok.
Hopefully, the problems are gone now.
FAQs
What are causes for laptop audio not working?
Drivers that are out of date or don’t work right can cause problems with hardware. Make sure that your audio driver is up-to-date and, if necessary, update it. If that doesn’t work, try removing the driver for the sound (it will restore itself). If that doesn’t work, try the basic audio driver that comes with Windows.
Where is Dell audio settings?
Click the “Start” button at the bottom left of your laptop’s screen.In the Control Panel window that just opened, choose “Hardware and Sound” from the menu.Adjust the volume by moving the volume button up or down.
Troubleshoot your audio settings
Yes, this might seem obvious to some of you. Yes, you might have already tried the troubleshooter. If you haven’t already tried, here’s how to use Windows troubleshooter for your audio problems.
This method has reportedly solved hissing and static noises.
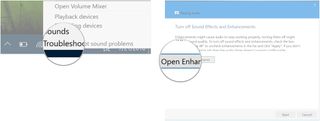
- Right-click the speaker icon in your taskbar. It’s located in the bottom right corner.
- Click Troubleshoot sound problems.
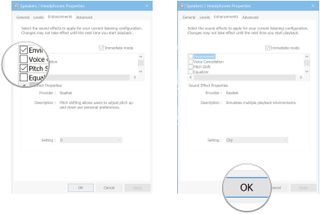
- Click Open Enhancements.
- Uncheck all boxes in the Enhancements field.
- Click OK.
- Click Next.
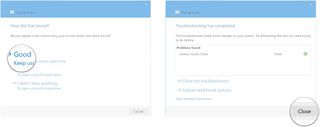
- Click Play test sounds. You should hear a series of sounds.
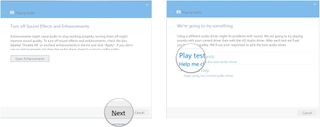
- Click the option that best suits what you heard.
- Good (Keep using my current audio driver)
- Bad (Try again using HD Audio driver)
- I didn’t hear anything (Try again using HD Audio driver)
- Click Close when you’re finished with the troubleshooter.
Часто задаваемые вопросы о неработающем звуке на ноутбуке Dell
Почему звук моего компьютера Dell не работает должным образом?
Если у вас возникли проблемы со звуком на компьютере Dell, это может быть вызвано несколькими причинами. Во-первых, проверьте уровень громкости на компьютере, чтобы убедиться, что он не слишком низкий или выключен. Вы также можете попробовать удалить и переустановить аудиодрайвер, чтобы он снова заработал должным образом.
Что такое звуковая карта на ноутбуке Dell?
Звуковая карта — это устройство, которое обрабатывает и воспроизводит звук на ноутбуке Dell. Она обеспечивает интерфейс между аппаратным обеспечением ноутбука и программным обеспечением, которое работает на нем, позволяя захватывать или выводить звук из таких программ, как музыкальные проигрыватели и видеоигры. Без звуковой карты ваш ноутбук не сможет воспроизводить звуки при воспроизведении мультимедиа.
Почему я не слышу звук из проигрывателя Windows Media Player?
Если вы не слышите звук из проигрывателя Windows Media, первым делом проверьте аудиоустройство. Убедитесь, что динамики или наушники подключены к соответствующему разъему аудиовыхода, включены и работают правильно. Также необходимо убедиться, что регулятор громкости не отключен и не уменьшен.
Повлияет ли обновление windows на аудиосистему Dell?
Windows Update может установить драйверы для вашей звуковой карты, которые могут быть несовместимы с вашей аудиосистемой Dell. Если это произойдет, у вас могут возникнуть проблемы с качеством звука или другие проблемы, связанные с аудио на вашем компьютере. Некоторые обновления Windows также могут быть большими и требовать перезагрузки, что может привести к потере всех настроек звука, которые у вас были установлены.
Что вызывает проблемы со звуком на ноутбуках Dell?
Неправильные настройки драйверов, вирус или вредоносная программа, устаревшие драйверы звуковой карты часто вызывают проблемы со звуком на ноутбуках Dell. Другие причины включают неисправные динамики, устаревшую прошивку и поврежденные аудиофайлы.
Почему звук не поступает через внешние динамики Dell?
Если у вас возникли проблемы с воспроизведением звука через внешние динамики Dell, существует несколько возможных причин. Наиболее распространенной причиной является неисправный или отсоединенный кабель, поэтому проверьте свои кабели и убедитесь, что они надежно подключены. Если кабели выглядят нормально, проблема может заключаться в настройках звука на компьютере.
![Исправлено: не работают динамики ноутбука [hp, asus, dell, acer]](https://portalcomp.ru/wp-content/uploads/f/b/4/fb4961d29cbc3ea5f9794790f3504972.png)

Conclusion
Your Dell monitor sound not working can initially be alarming. No need to worry. Follow these 8 troubleshooting steps to get your audio functioning properly again!
- Confirm monitor audio output compatibility
- Update default audio source
- Adjust monitor volume
- Inspect PC volume settings
- Enable Loudness Equalization
- Check audio cables
- Update computer applications and audio driver
- Ensure BIOS audio onboard device is enabled
If none of these fixes helped, you can contact Dell consumer & member purchase sales support at 1-877-717-3355. Or you can contact Dell Technical Support online.
You can also check out your Dell warranty policy.
Were you able to get your sound turned back on? If so, let me know how in the comments section below!
Don’t Let Sound Issues Frustrate You – Fix Them on Your Dell Laptop
In conclusion, if you’re experiencing issues with your Dell laptop’s sound, you can take several troubleshooting steps to resolve the problem. Start by checking for hardware problems with your laptop’s speaker, headphone jack, or microphone. Next, check your audio settings and try changing the audio format. Updating your drivers or reinstalling the audio driver can also help. If you still have issues, run the Microsoft Sound Troubleshooter or download and install Windows updates. Updating the BIOS system setup or even reinstalling Windows are other options. Finally, if all else fails, don’t hesitate to contact Dell support for further assistance.
Why Is Dell Laptop Sound Not Working on Windows 11?
There can be several reasons why Dell laptop sound not working on Windows 11. Here are some possible causes and solutions to consider:
- Audio driver issues: Outdated or incompatible audio drivers can lead to sound problems. To resolve this, update your audio drivers to the latest version compatible with Windows 11. You can download the drivers from the Dell website or use a driver update utility.
- Incorrect audio settings: Check your audio settings to ensure they are properly configured. Right-click the volume icon on the taskbar, select «Open Sound settings,» and verify that the correct audio output device is selected.
- Audio enhancements and enhancements conflicts: Disable any audio enhancements or enhancements conflicting with the sound output. Open Sound settings, click on «Device properties,» go to the «Additional device properties» section and disable any enhancements enabled there.
- Hardware issues: Verify that the speakers or headphones are properly connected to the laptop and functioning correctly. Try connecting different audio devices to determine if the issue is specific to one device.
- Windows updates: Check for Windows updates and install any available updates. Sometimes, sound issues can be resolved by installing the latest updates that include bug fixes and driver updates.
- Malfunctioning audio services: Restart the Windows Audio service to address any potential issues. Press Windows + R, type «services.msc,» and press Enter. Locate «Windows Audio» in the Services window, right-click on it, and choose «Restart.»
Dell Laptop Headphone Jack Not Working– Resolving the Issue
It’s possible that the headphones are not working or the headphone jack is not working simply because they are broken.
If not, why are your headphones not working with the laptop but working fine with other devices? Let us tell you the reasons first, and then we will discuss resolving them:
Know Why Dell Laptop Headphone Jack Not Working
A lot can cause the headphone jack not working in your Dell laptop. The most obvious reason is that you haven’t selected the integrated speakers to perform or they are left muted. If the files in the audio driver or sound card get corrupted, headphones will not work.
If the programs, like Media Player, for playing audio files are not installed properly, there will be no sound – either in the headphone or in the computer or external speakers. Often the audio driver becomes outdated and doesn’t sync with the laptop.
Sometimes there can be static charges stored in the metal part of the headphone jack due to inefficient earthing of the electricity supply of the whole building.
All the above reasons can make the headphones not working.
Let’s get to know how we can fix the problem in different versions of Windows.
Dell Headphone Jack Not Working In Windows 10
To comply with popular and professional demands, Dell equips every laptop with contemporary software and hardware. That’s why, if yours is a recent purchase, chances are, your laptop is running on Windows 10.
So, knowing a few basic tricks might make the problem solved.
Restart Your Laptop
While the headphone jack is still attached, a simple rebooting of your system may rectify the whole issue. So, go ahead and try it.
Set The Headphone As The Default Device For Audio
Follow the steps as below:
- Press’ Windows Key + I’ to go ‘Setting’ and then opt for ‘System’. You will get a tab called ‘Sound’ on the left and choose it.
- From there, go to the’Manage Sound Devices’ tab. You will see that the ‘Speakers’ option is currently on ‘Disabled’ mode. You need to change the mode to ‘Enable’ option.
- The final step would be going back to‘Sound Settings’ and from the dropdown menu, select ‘Headphone’ from the‘Choose Your Output Device’option.
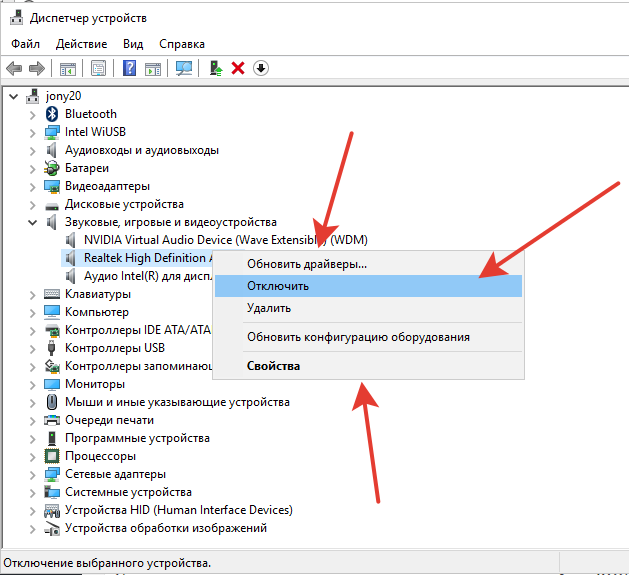
Disabling The Detection Of Jack In The Front Panel
If your Dell laptop headphone jack is not working with a Realtek sound card, fix it by making the front panel jacks inactive. Please follow the below steps:
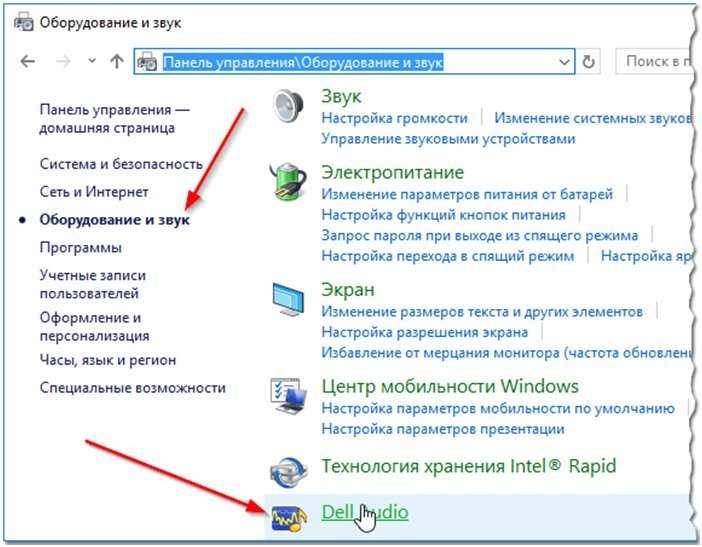
- Go to the Control Panel from the search bar.
- From the dropdown menu, select Realtek HD Audio Manager and select theConnector Settings option.
- There you can find the Disable Front Panel Jack Detection option. Simply choose the OK button.
- Restart.
Use Audio Troubleshooter
The troubleshooter in Windows 10 is an excellent tool to fix various issues. Here is how you would use it:
- Go to the Settings app by simultaneously pressing the Windows + I keys.
- SelectUpdate & Security option.
- After that choose Playing Audio, which you will get under the tab setup and Run category.
- Choose Run from the troubleshooter button.
- The tool will start working automatically and fix problems along the way.
Update The Audio And Sound Driver
Regular updates of the drivers can rectify obsolete audio drivers, which sometimes cause various issues.
- Go to the Run application.
- Write the following ‘devmgmt.msc’in the taskbar without quotation marks. Pressing OK will get you to the Device Manager option.
- Initiate the Sound, Video, and Game controllers bypressing the arrow icon.
- Right-click on Audio Driver then click on Update Driver.
- Select Search Automatically For Updated Driver Software.
Disable The Audio ‘App’ Control Over Sound System
This method is known to work best for the Latitude series.
- Go to Settings and select the Sound option. You can to do it comfortably by now.
- Under the Output tab of the Speaker/Headphone options, Choose Device Properties.
- From the dropdown menu, you will find ‘Related Settings’, and from there, go to ‘Additional Device Properties’
- Go to the ‘Advanced’ tab and click ‘Under Exclusive’ mode.
- You will find that ‘Allow’ option was selected to let the ‘Apps’ to take over the sound system of the device. Now, just deselect the option.
- Restart.
And you are good to go.
Troubleshooting Steps for Dell Audio Issues
A systematic approach can often resolve Dell audio problems.
Checking Audio Settings
First, ensure your audio isn’t muted and the correct playback device is selected. This simple step can solve basic issues.
Updating Audio Drivers with DriverSupport
Outdated audio drivers are a common cause of problems. DriverSupport automates the process of identifying and updating these drivers, ensuring your audio hardware and software communicate effectively.
Using Windows Troubleshooter
The Windows Troubleshooter automatically identifies and fixes common audio problems. Running this tool can offer quick solutions.

![12 fixes for laptop speakers not working [asus, hp, dell, acer] (2024)](https://portalcomp.ru/wp-content/uploads/d/d/d/dddf2b515701fb9330544ac61c26052a.jpeg)
Restoring System Settings
If audio issues started after recent changes, using Windows System Restore to revert to a previous state might help undo changes causing the problem.
Updating audio driver
Updating Audio Driver for Dell Inspiron 13
To fix audio issues on your Dell Inspiron 13, updating the audio driver is often the solution. Follow these steps to update the audio driver on your laptop:
1. Open your web browser and go to the Dell support website.
2. Search for your specific Dell Inspiron 13 model, such as the 13 7000 series or XPS.
3. Find the “Drivers and Downloads” section for your model.
4. Look for the audio driver and click on the download button.
5. Once the download is complete, locate the downloaded file and double-click on it to start the installation.
6. Follow the on-screen instructions to complete the installation process.
7. After the installation is finished, restart your computer.
Updating the audio driver can resolve a multitude of audio problems, such as distorted sound, no sound from laptop speakers, or issues with external speakers or headphones.
Remember to always keep your audio driver updated to ensure optimal audio performance on your Dell Inspiron 13.
Adjusting audio settings
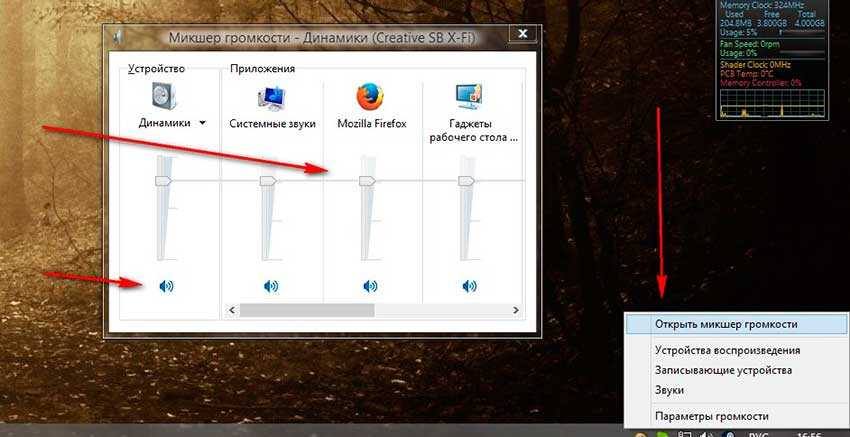
1. Access the audio settings on your Dell Inspiron 13 by clicking on the speaker icon in the bottom right corner of your screen.
2. Right-click on the speaker icon and select “Open Volume Mixer” to adjust the volume levels for different applications.
3. If you’re experiencing issues with specific applications, check their individual audio settings. Right-click on the application’s icon, go to “Properties,” and make sure the audio settings are configured correctly.
4. Update your audio drivers by visiting the Dell support website (http://www.dell.com/support) and downloading the latest audio driver for your Dell Inspiron 13.
5. If you’re still experiencing audio issues, try troubleshooting the audio device in the Device Manager. Open Device Manager, locate the audio device, right-click on it, and select “Update driver” or “Uninstall device” if necessary.
By following these steps, you can adjust your audio settings and resolve audio issues on your Dell Inspiron 13.
Causes For Dell Laptop Headphone Jack Problem
There are lots of reasons why the headphone jack of your Dell laptop is not working properly. You might just need to select or deselect some options for its audio to work again. If the problem is not the system, then hardware damage might be a possibility.
Focusing on the software bugs first, go over the common causes listed below as to why the headphone jack of your Dell laptop is malfunctioning.
- The audio driver is not updated.
- The application for audio is not properly installed like the Media Player.
- The speakers are left muted.
- The integrated speakers are not selected to function.
- Windows 10 is having system issues.
- The audio driver or sound card is corrupted.
Распространенные причины прекращения работы звука ноутбука Dell
Существуют различные причины, по которым звук на ноутбуке Dell может перестать работать. Понимание этих распространенных причин поможет более эффективно диагностировать и устранить проблему. Вот некоторые из наиболее частых причин, по которым звук на ноутбуке Dell перестает работать:
Настройки приглушения или низкой громкости: Иногда звук на ноутбуке Dell может перестать работать из-за того, что громкость случайно отключена или установлена слишком низкой. Необходимо проверить настройки громкости ноутбука, чтобы убедиться, что они находятся на приемлемом уровне.
Устаревшие звуковые драйверы: Устаревшие звуковые драйверы часто могут вызывать проблемы со звуковой системой ноутбука Dell, поскольку старые драйверы могут быть несовместимы с новым программным обеспечением или аппаратными компонентами. Обновление звуковых драйверов может решить эту проблему во многих случаях, обеспечивая правильную работу звуковой системы ноутбука.
Проблемы с аппаратным обеспечением: Аппаратные проблемы с динамиками ноутбука или разъемом для наушников также могут привести к тому, что звук перестанет работать. К ним относятся физические повреждения, ослабление соединений или неисправность динамиков
Очень важно проверить аппаратное обеспечение ноутбука, чтобы убедиться в отсутствии таких проблем, вызывающих проблемы со звуком. Неправильные настройки или формат аудио: Звук на ноутбуке Dell может перестать работать из-за неправильных настроек звука или несовместимого аудиоформата
Регулировка настроек звука и выбор правильного формата могут быстро устранить проблему и восстановить звук на ноутбуке.
Поврежденные аудиофайлы или программное обеспечение: Поврежденные аудиофайлы или программное обеспечение также могут привести к тому, что звук на ноутбуке Dell перестанет работать. Переустановка или замена поврежденных файлов или программного обеспечения часто может устранить эту проблему и восстановить работоспособность звуковой системы.
Конфликтующее программное обеспечение или приложения: Иногда конфликтующее программное обеспечение или приложения, установленные на ноутбуке, могут нарушать работу аудиосистемы, в результате чего звук перестает работать. Выявление и устранение этих программных конфликтов может помочь восстановить звук на ноутбуке Dell.
Устаревшая BIOS или системная прошивка: Обновление BIOS может обеспечить поддержку новых аппаратных и программных компонентов, устранить проблемы со звуком и обеспечить оптимальную производительность системы.
В заключение, понимание общих причин проблем со звуком на ноутбуке Dell может помочь пользователям более точно и эффективно диагностировать проблему. Рассмотрев эти возможные причины и выполнив шаги по устранению неполадок, упомянутые ранее в статье, пользователи смогут восстановить звуковую систему своего ноутбука и решить проблемы, связанные со звуком.
Step 7: Update Computer Applications And Audio Driver
If none of the above fixes have worked, your PC applications or audio driver may be out of date.
How To Update Your Computer Applications (Windows 10)
Many application publishers will provide periodic updates to their apps. Often times these updates include new features or provide fixes to various app issues.
You can use your Microsoft Store on Windows to automatically install app updates.
- First select Start, and click on the Microsoft Store.
- Once you are in the Microsoft Store, select the account menu and then select Settings.
- Under App updates, set Update apps automatically to On. Here you can see my default settings are set to update apps automatically already. This may also be the case from some of you. For others, you will need to use the toggle button to turn this setting on.
Depending on your version of Windows, these steps may slightly vary. Check out the official to learn how to update your apps across Windows versions.
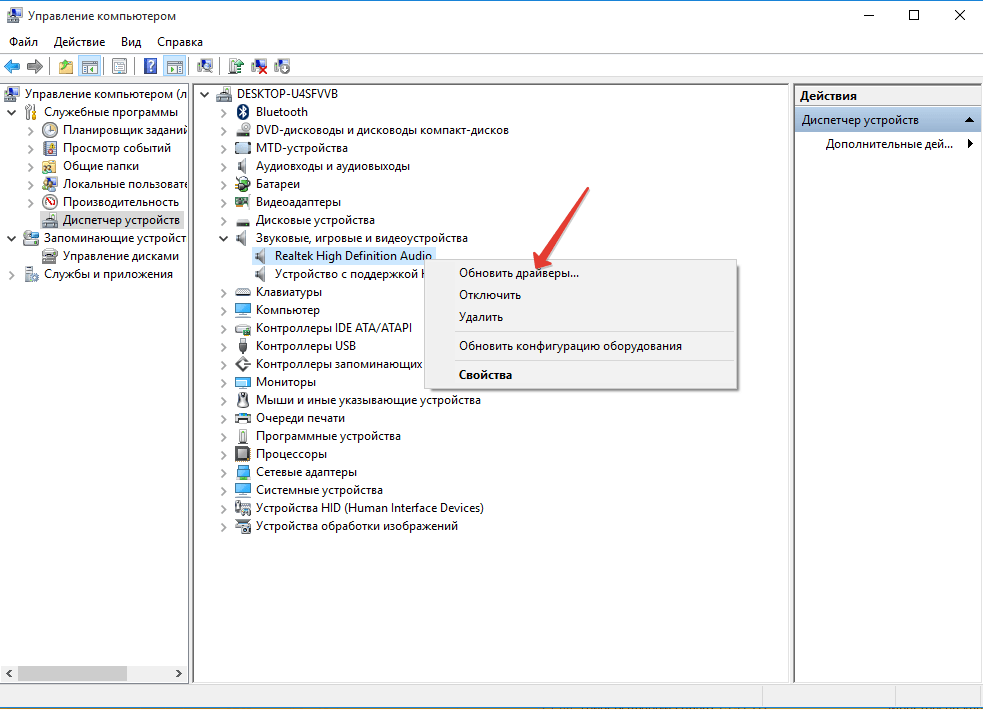
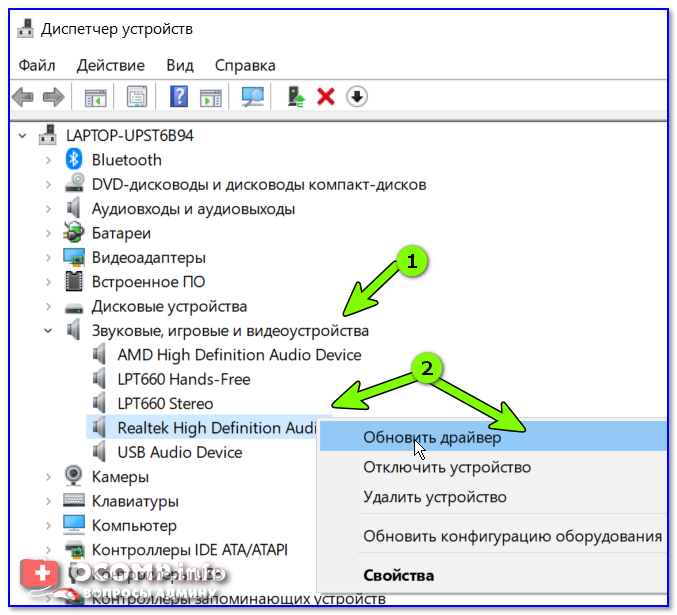
How to Update And Reinstall Your Audio Driver (Windows 10 / 11)
Sometimes the audio driver is specifically to blame. To test this, first try to update the audio device driver directly.
Head over to the search box and this time enter Device Manager. Under Sound, video and game controllers right-click on the name of your audio device, and select Update driver.
First, select Search automatically for updated driver software and wait for your audio driver to be updated. If this doesn’t work, select Search for update drivers on Windows Update instead.
If this does not fix your problem, try uninstalling the sound driver by right-clicking and selecting Uninstall.
Then simply Restart your computer – Windows will automatically attempt to reinstall the audio driver during startup.
If your driver does not automatically reinstall, or if you do not see your specific audio device driver within the device manager to start with, you will need to download it.
Simply head over to Google and type in your device name, model number, and “audio driver” to locate it.
Step 2: Update Default Audio Source
It is also incredibly common to experience this issue due to having the incorrect audio source selected on your PC.
Therefore, it is critically important to set the audio output of your PC to the specific monitor or audio device you are using.
The specific settings will differ slightly depending on the operating system you are using.
For Windows 10, and the vast majority of Windows operating systems, first select select volume from the application tray in the bottom right corner of your screen.
This may appear as a standalone volume icon as shown below, or you may need to click the application up arrow icon and select it there.
Here you will find each of the available audio sources. In my case, I have an external speaker attached to my monitor and so this is what I have selected.

![Исправлено: не работают динамики ноутбука [hp, asus, dell, acer]](https://portalcomp.ru/wp-content/uploads/9/6/5/96500419d506a6d90c0c6f4b2fef2849.jpeg)

For Dell monitors with built-in speakers, you can select the monitor itself as the playback device. Similarly if you are using external headphones, you will be able to select them here.
Frequently Asked Questions(FAQs)
1. How Do I Turn On The Headphone Jack On My Dell Laptop?
If you want to turn on the headphone jack on your Dell laptop, then follow the steps mentioned below:
- Click on the Start menu followed by a click on the Settings icon.
- Then, on the left menu, click on Sound.
- Now, under choose your Output device, select the audio device that you want to use.
2. How Can You Fix A Water-Damaged Headphone Jack?
For fixing a water-damaged headphone jack, you should use a cotton swab.
Insert some cotton from the end into the slot and turn it gently to absorb the residual water.
Doing this will help you in resolving the issue.
3. How Can I Use The Microphone Jack As A Headphone Jack On My Laptop?
This is how you can use the microphone jack as a headphone jack on my laptop:
- First, you need to plug your earphones into the jack.
- Then, type “manage audio devices” in the search box and click on it.
- You will soon see the Sound Control Panel opening up.
- Finally, click on the “Recording” tab on the Sound Control Panel.
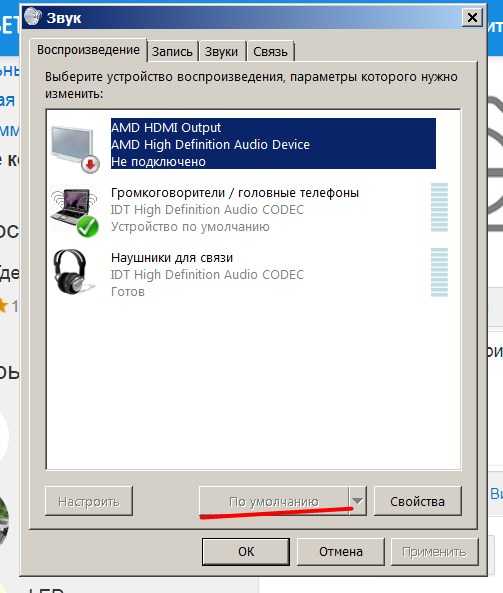
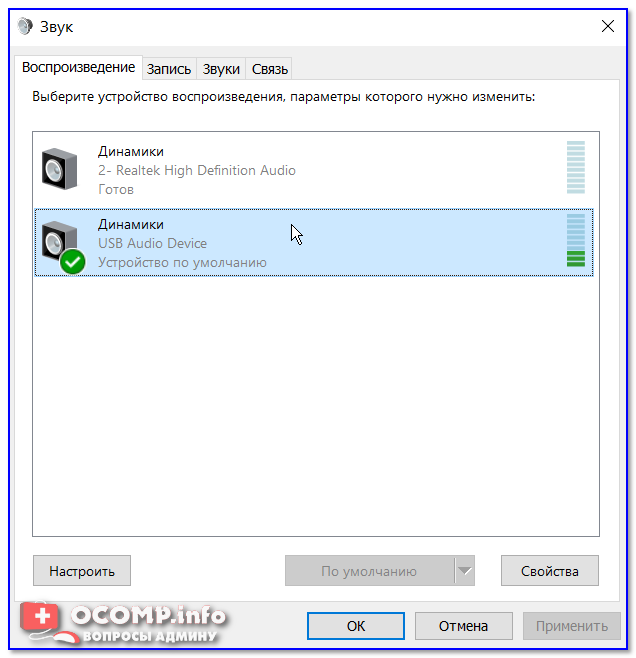
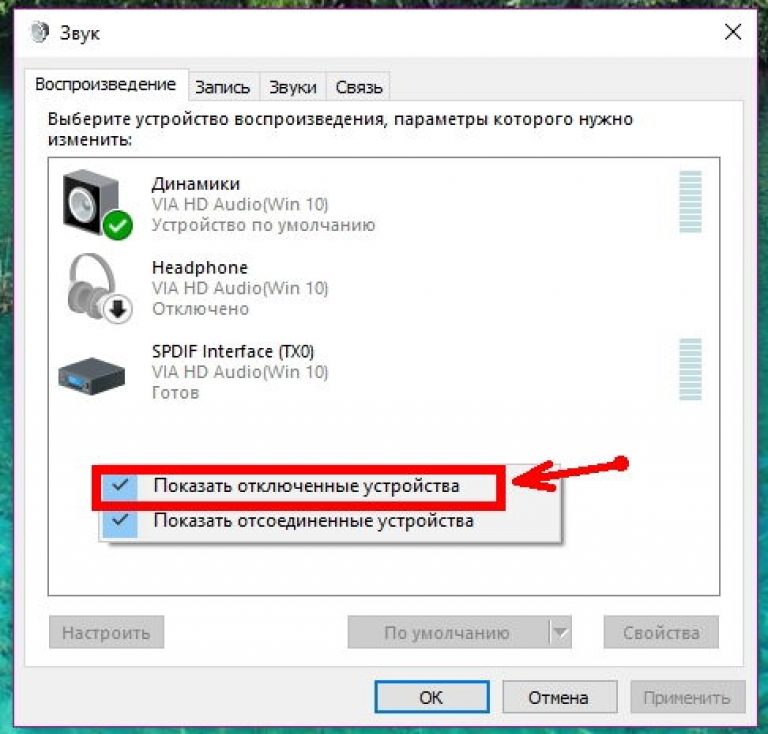
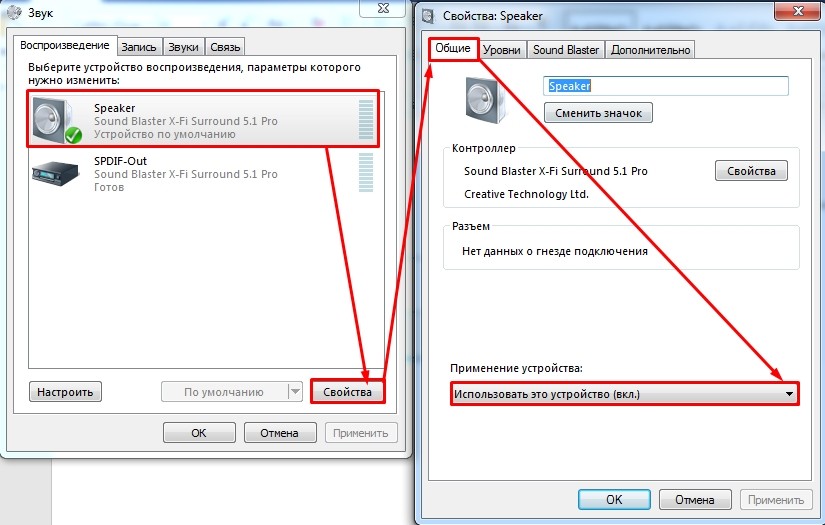
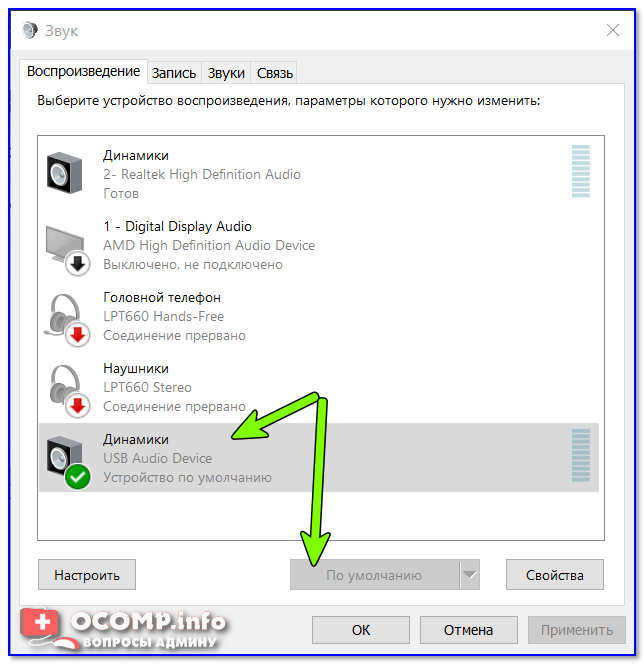
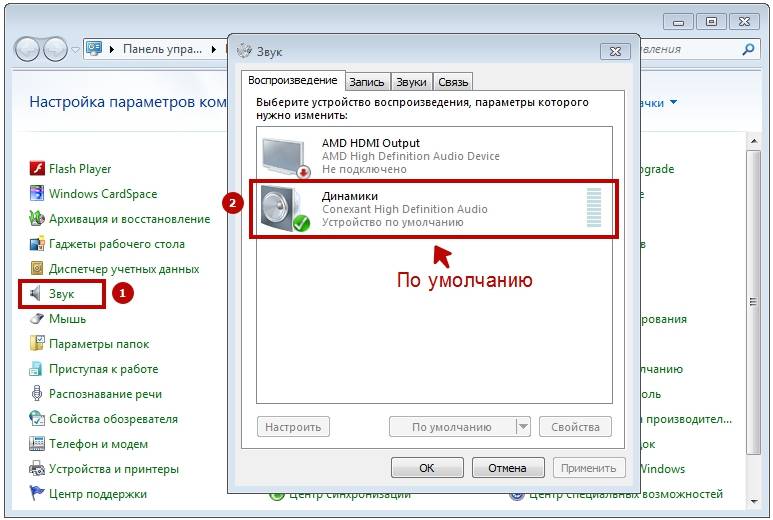
Check Default Audio Devices
Your system configures a single device as the default audio device at a time. Only such devices can play the audio. So if this configuration is changed, you won’t get any sound on your speaker/headphones.
This issue is more likely to occur if you connect your device to an external monitor using HDMI, DisplayPort, USB-C, etc. These connections also support audio transmission so the default device may have changed to your monitor instead. Or it may also happen if you had connected a different speaker earlier and removing it didn’t revert the default device configuration.
- Type and press Enter to open Sound Options.
- Look for your audio output. The built-in audio output should have the label Speakers.
- If you can’t find it, right-click on any device and make sure Show Disabled Devices and Show Disconnected Devices are checked. You need to click on them to check/uncheck the options.
- Then, if the audio device you wish to use as output is disabled, right-click on it and select Enable.
- Right-click on it again and select Set as Default Device and Set as Default Communication Device if the options exist.
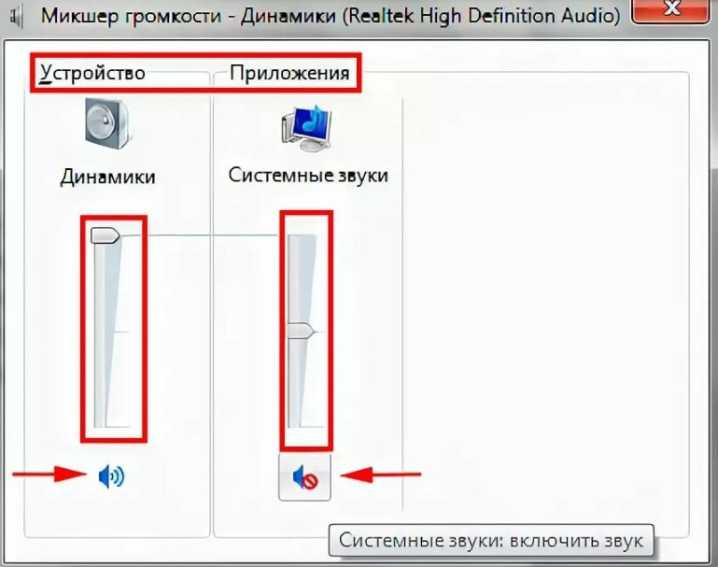
- Double-click on the Device to access its Properties.
- Go to the Levels tab and make sure the volume is alright.
- Go to Enhancements and check Disable all enhancement.
- Then, head to the Advanced tab and uncheck Allow applications to take exclusive control of this device.
- Click on Test and see if you can hear a sound.
- Hit Apply and OK.
- Go to Recordings and do the same (Steps 2-11).