

Отправить анонимное письмо
Отправить анонимное письмо Это веб-приложение, которое может сделать так, чтобы электронная почта была отправлена кем-то другим. Утверждает, что отправил более 60 000 сообщений Анонимная электронная почта со своих серверов ежедневно. Это число кажется нам большим, но очевидно, что это широко используемое приложение, независимо от реального числа.
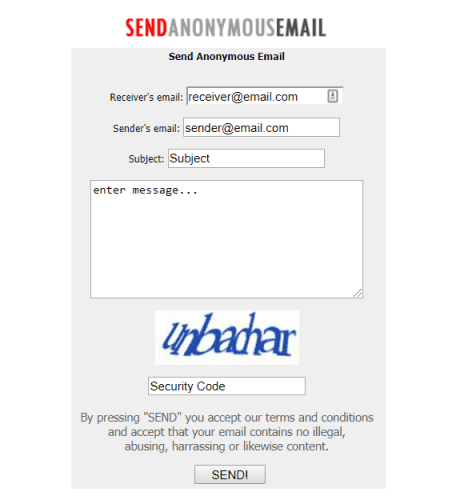
На данный момент среди трех сайтов в списке меньше всего возможностей и возможностей обслуживания. Вы можете выбрать только адрес электронной почты получателя, адрес электронной почты отправителя, тему и сообщение. Вложений нет, доступен только стандартный текстовый редактор.
Вы не можете добавлять цвета, изменять шрифт или изменять другие параметры форматирования. Вам нужно будет ввести код безопасности, прежде чем Отправить анонимное письмо позволит вам отправить поддельное сообщение.
Следует отметить, что сервис Отправить анонимное письмо Он серьезно относится к неправомерному использованию своих услуг. В соответствии с условиями компании укажите, что если вы отправляете угрозы смертью, жестоким обращением или клевета Или что-то незаконное, компания опубликует ваш IP-адрес и заблокирует его с сайта.
(Заметка: Компания обеспечивает себя дополнительные услуги отправлять SMS сообщения Анонимный или фальшивый.)
Как войти в Outlook Web App?
1. Перейдите по этой ссылке на страницу сервиса. Здесь вам доступны две кнопки: «Войти» и «Зарегистрироваться». Если у вас еще нету почтового аккаунта Microsoft, его можно создать, если щелкнуть по кнопке «Зарегистрироваться». Для входа в существующую почту щелкните по кнопке «Войти».
2. Выполняя вход в аккаунт, вам потребуется ввести ваши данные от учетной записи Microsoft – адрес электронной почты и пароль.
3. Как только вы введете свои учетные данные, на экране начнется загрузка Outlook Web App. В следующее мгновение на экране отобразится содержимое вашего почтового ящика, а именно входящие письма.
4. Казалось бы, веб-версия почтового клиента, но благодаря количеству функций и интерфейсу данный сервис может дать серьезную нагрузку на систему, что будет ощутимо на слабых компьютерах. В данном случае вы можете решить проблему, если активируете облегченную версию Outlook Web App.
Для этого в правом верхнем углу окна щелкните по иконке с шестеренкой, а затем в отобразившемся окне выберите пункт «Параметры».
5. В левой области окна разверните вкладку «Общие», а затем пройдите к пункту «Облегченная версия».
6. В развернувшемся окне поставьте галочку около пункта «Использовать облегченную версию Outlook»
Обратите внимание, что для последних браузеров данная функция недоступна, поскольку Microsoft постепенно хочет и вовсе убрать облегченную версию, оставив лишь переработанную
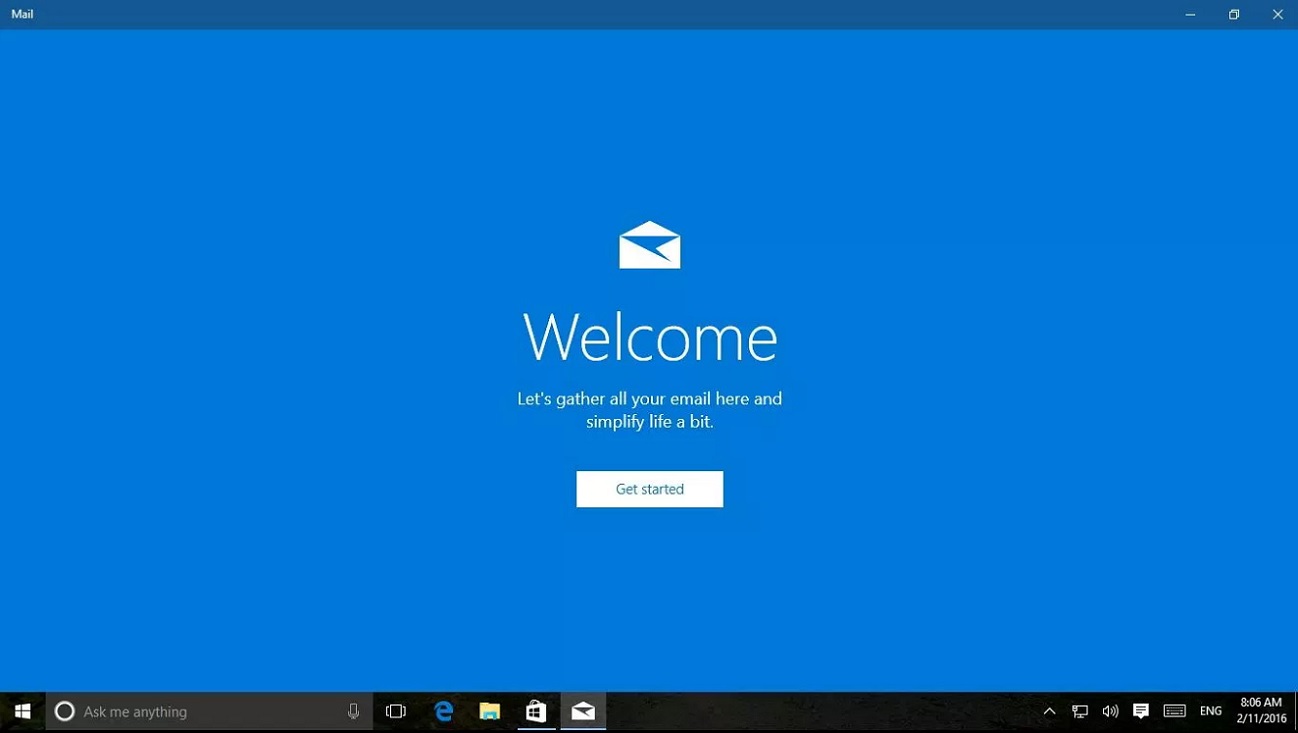
Outlook – удобный и функциональный почтовый клиент, идеально подходящий как для повседневного использования, так и для бизнеса. Когда нет возможности воспользоваться настольной версией почтового клиента, хорошую альтернативу ему составит Outlook Web App, т.е. браузерная версия клиента.
Visit owa.nso.ru
Sign In
| Global rank | 18 799 |
|---|---|
| Daily visitors | 180 |
| Daily pageviews | 504 |
| Pageviews per user | 2.8 |
http://owa.nso.ru
Countable Data Brief
Nso.ru is tracked by us since April, 2011. Over the time it has been ranked as high as 18 815 in the world, while most of its traffic comes from Russian Federation, where it reached as high as 478 position. Owa.nso.ru receives about 0.25% of its total traffic. It was owned by several entities, from Administration of Novosibirsk region to GBU NSO «Centr informacionnyh tekhnologij Novosibirskoj oblasti», it was hosted by State Budget Enterprise of Novosibirsk region «Novosibirsk region center of information technologies» and CIT NSO route. While RU-CENTER-REG-RIPN was its first registrar, now it is moved to RU-CENTER-RU.
Owa.nso has the lowest Google pagerank and bad results in terms of Yandex topical citation index. We found that Owa.nso.ru is poorly ‘socialized’ in respect to any social network. According to MyWot, Siteadvisor and Google safe browsing analytics, Owa.nso.ru is a fully trustworthy domain with no visitor reviews.
Owa.nso.ru has 180 visitors and 504 pageviews daily.
Pageviews
Subdomains Traffic Shares
Shkola.nso.ru is the most popular subdomain of Nso.ruwith 59.14% of its total traffic.
Top Subdomains
| shkola.nso.ru | 59.14% |
| nszn.nso.ru | 3.48% |
| minobr.nso.ru | 3.08% |
| nso.ru | 3.00% |
| other | 24.77% |
This Subdomain
owa.nso.ru
0.25%
SEO Stats
Owa.nso.ru is not yet effective in its SEO tactics: it has Google PR 0. It may also be penalized or lacking valuable inbound links.
Ranks
Google PR
—
Yandex CY
Metadata Updates Get moreOwa.nso.ru metadata updates


Homepage Top Backlinks PR
No data
Top Keywords % of search traffic
No data
Domain Registration Data
Owa.nso.ru domain is owned by GBU NSO «Centr informacionnyh tekhnologij Novosibirskoj oblasti» and its registration expires in 25 days.
General Get moreNso.ru whois history
|
GBU NSO «Centr informacionnyh tekhnologij Novosibirskoj oblasti» Owner since June 09, 2016 |
|
|---|---|
|
25 days left Expires on January 01, 2020 |
22 years old Created on November 18, 1997 |
Server Information
Owa.nso.ru is hosted by CIT NSO route.
IP Whois Get moreOwa.nso.ru server history
-
CIT NSO route
-
185.138.128.15
IP address
Server Technologies
No data
DNS Records
ACNAME
Nameservers
No data
| host | value | ttl |
|---|---|---|
| owa.nso.ru |
185.138.128.15 |
3507 |
| host | value | ttl |
|---|---|---|
| owa.nso.ru |
wap.nso.ru |
3507 |
Safety
Safety status of Owa.nso.ru is described as follows: MyWOT reports its overall reputation as excellent and Google Safe Browsing reports its status as safe.
Get moreOwa.nso.ru reviews
Composing your first email
Crafting and sending a message is a simple process, just follow these steps:
- Open the Mail app.
- Select the account you want to use to send a new email from the left pane.
- Click the New mail button from the left pane.
- In the «To» field enter the email address of the recipient.Quick Tip: You can send the same email to multiple people by separating each address using a semicolon (;).
- In the «Subject» field, enter a title for the email.
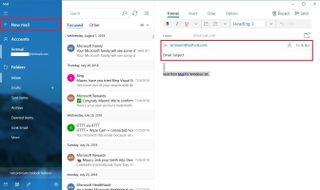
- Click the message body to start writing your email.
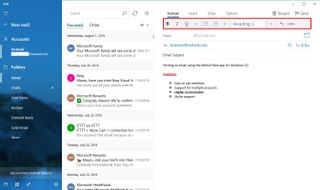
While writing your message, you’ll notice that the Format tab is now available with tools to format text, lists, heading, and options to undo and redo content.
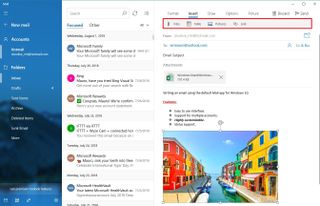
If you want to send a file, you can use the Insert tab, and click the Files button. Also, using this tab, you can also send pictures, links, and even create tables.
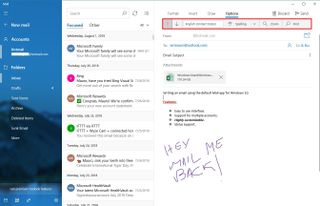
Once you’ve completed writing the message, you can click the Send button in the top-right corner or click the Discard button to delete the message.
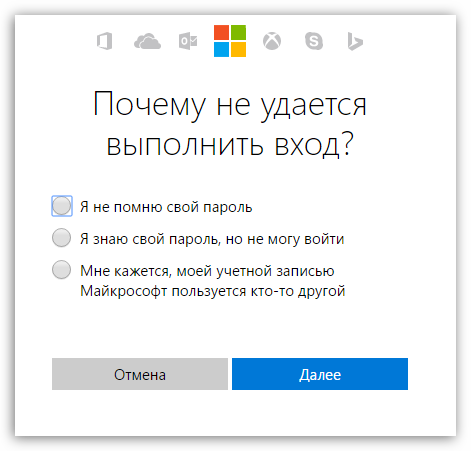
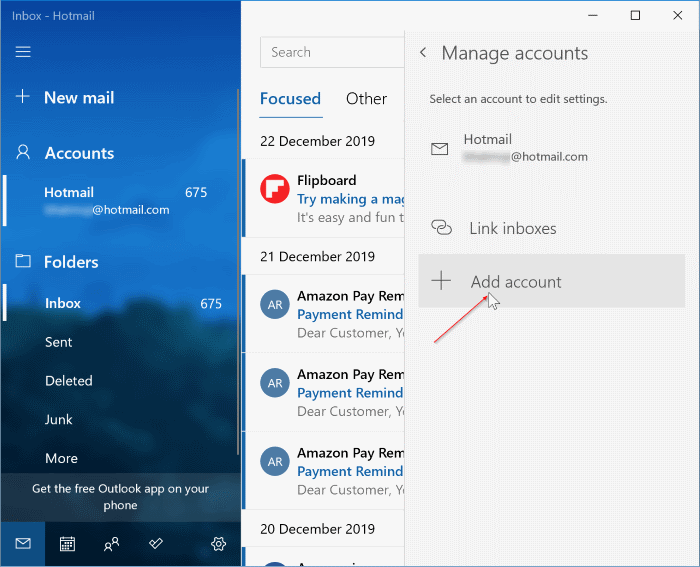
Вопрос 2: не удается войти в почту, хотя логин и пароль правильные
Как правило, здесь с вероятностью в 90% можно утверждать, что проблемы со входом возникли именно в результате неправильного ввода логина и пароля. Несколько раз перепроверьте указываемые данные, уточните раскладку клавиатуры, активность клавиши Caps Lock и наличие пробелов. Возможно, вы недавно меняли пароль, но уже успели забыть об этом.
Если попытки входа так и не увенчались успехом, придется прибегнуть к процедуре восстановления доступа. Для этого на странице авторизации в почте Outlook вам потребуется сначала указать логин, а в месте, где требуется ввести пароль, щелкнуть по кнопке «Забыли пароль».

На экране отобразится страница, на которой вам поэтапно надо отвечать на заданные вопросы в зависимости от типа проблемы. Если в качестве запасных источников у вас были указаны мобильный телефон или иной адрес электронной почты, то с высокой долей вероятности вы сможете успешно восстановить доступ к странице.
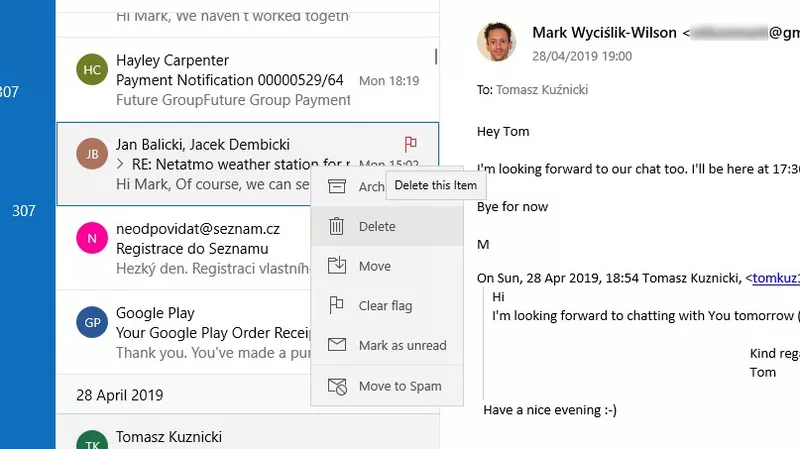
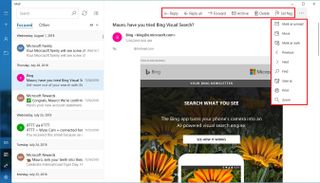
Checking and replying emails
- Open the Mail app.
- Select the account to send a new email from the left pane.
- Under «Folders,» select the list of emails.
- In the message list, select the email you want to read, which will open in the reading pane on the right.Quick Tip: If you need more space to view or compose emails, you can always collapse the left pane using the hamburger menu button in the top left corner.
If the folder that you need to access isn’t in the list, click the More option, and either select the folder you want to see, or right-click the folder you want and select the Add to Favorites option, so it’ll always appear under «Folders.»
Партизанская почта

Ни одна из рассмотренных нами до сих пор служб не позволяет получать ответы по электронной почте; Поскольку он не предоставляет услуги входящей почты.
Однако некоторые услуги предоставляют — например, GuerrillaMail Возможность получать входящую электронную почту и может использоваться для отправки поддельной электронной почты. Но есть компромисс. Вы не можете отправить поддельное письмо от кого-то другого; GuerrillaMail не позволяет добавлять собственный адрес. Вы можете установить любое имя пользователя, которое хотите, но оно ограничено одним из предопределенных доменов приложения.
Более того, электронные письма в папке «Входящие» сохраняются всего 60 минут. После этого GuerrillaMail автоматически удалит сообщения со своих серверов. Если вы не будете регулярно искать ответы на свою шутку, вы рискуете вообще упустить результаты.
Отправитель Emkei’s Mailer
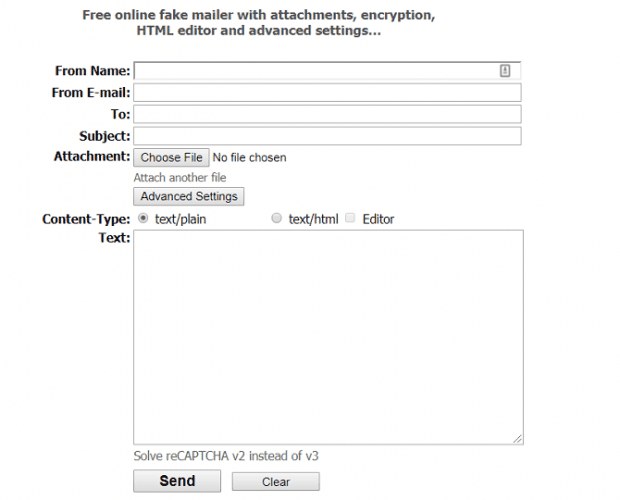
я Почтовик Эмкея Сервис, похожий на Deadfake. Вы можете выбрать оба الاسم ، из электронной почты ، мне ، الموضوع ، И сообщение.
Наиболее существенное различие между двумя сервисами — это поддержка вложений Emkei Mailer. Согласно большинству почтовых сервисов, максимальный размер вложения составляет 25 МБ.
Emkei’s Mailer также предлагает простой текстовый редактор и редактор HTML при составлении вашего сообщения. Таким образом, приложение легко использовать для быстрой работы, но его также можно развернуть, если вы хотите, чтобы поддельное письмо выглядело более убедительно.
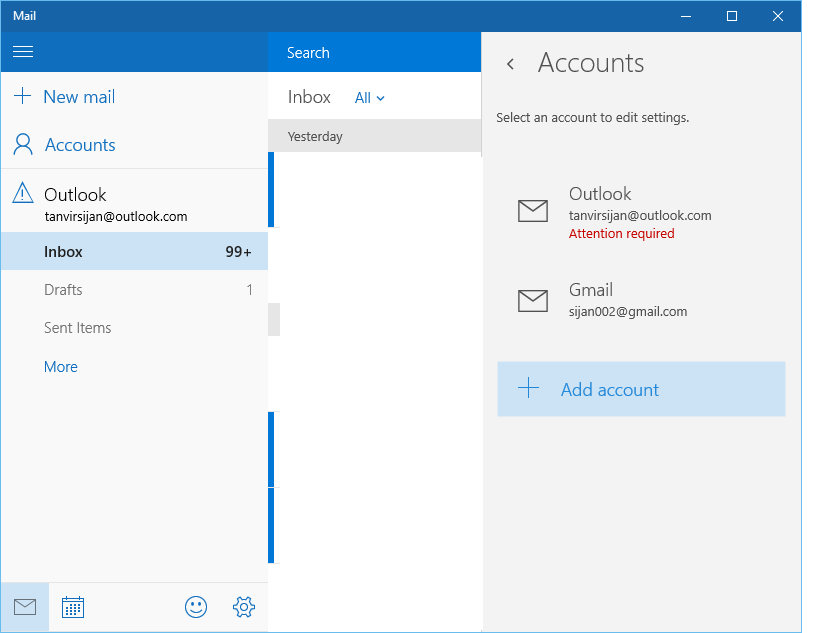
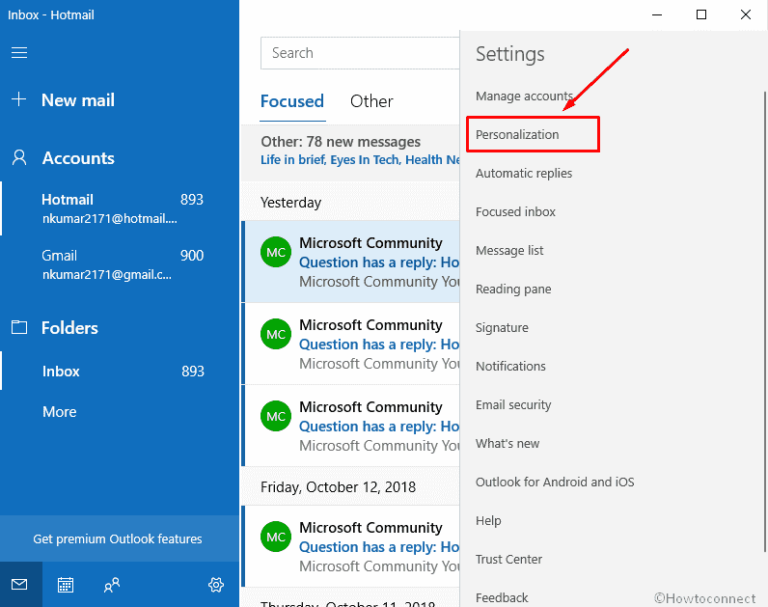
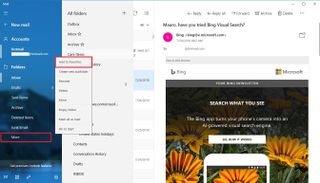
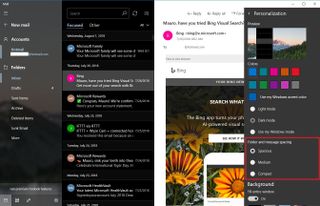
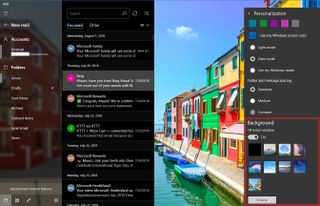
Customizing the Mail app experience
Personalizing background image, color, and mode
To set the background image, color accent, and switch between the dark and light mode, use these steps:
- Open the Mail app.
- Click the Settings (gear) button at the bottom of the left pane.
- Select the Personalization option.
In this page, you can change the color accent for the experience, switch between light and dark mode, or you can allow the app to match the system mode currently in use.
Using the «Folder and message spacing» settings, you can adjust the display density to fit even more content in the screen.
Configuring automatic replies
- Open the Mail app.
- Click the Settings (gear) button at the bottom of the left pane.
- Click the Automatic replies option.
- Use the drop-down menu to select the Outlook email address you want to configure.
- Turn on the Send Automatic Replies toggle switch.
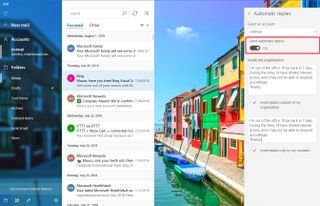
- Under «Inside my organization,» create a custom message that senders will receive during your time away.
- Check the Send replies outside of my organization option, if you want to send an out-of-office reply to every email you receive that wasn’t originated within your organization.
- If you must limit responses to a specific group of people, check the Send replies only to my contacts option.
- In the second box, create a custom message that your contacts will receive during your time away.
Once you’ve completed the steps, your account will send automatic replies based on your configuration.
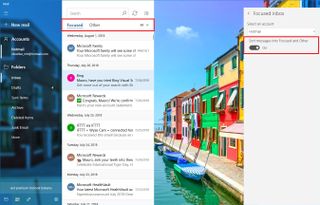
Configuring focused inbox
To enable or disable Focused inbox, follow these steps:
- Open the Mail app.
- Click the Settings (gear) button at the bottom of the left pane.
- Click the Focused inbox option.
- Use the drop-down menu to select the Outlook email address you want to configure.
- Turn on or off the Sort messages into Focused and Other toggle switch.
Personalizing the messaging list pane
To change the settings the for message list pane, use these steps:
- Open the Mail app.
- Click the Settings (gear) button at the bottom of the left pane.
- Select the Message list option.
Under the «Swipe actions» section, you can enable or disable swipe the gestures and decide the action when swiping a message to the right or left.
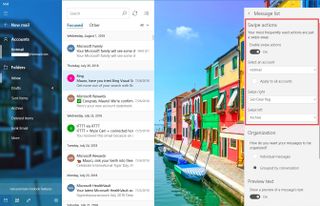
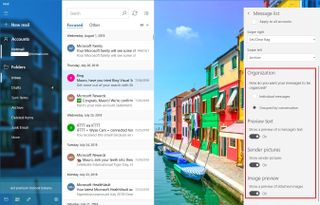
Also, at the bottom of the page, it’s possible to personalize several other features, including:
- Organization: Allows you to group emails by conversation, or you can organize each message in chronological order as they arrive.
- Preview text: Shows a short preview of the content message.
- Sender pictures: Displays a profile image of the sender. If the image isn’t available, a standard icon will appear.
- Image preview: Shows a small preview of the image included in the message.
Personalizing the reading pane
To change the settings for the reading pane, use these steps:
- Open the Mail app.
- Click the Settings (gear) button at the bottom of the left pane.
- Select the Reading pane option.
In this page, you can customize many features, including:
- Auto-open: If enabled, when you delete a message, the next email in the message list will open automatically.
- Mark item as read: Allows you to decide when a message will get marked as read after it’s open.
- Caret browsing: When enabled, you can navigate emails using the text cursor.
- External content: If disabled, external elements, such as images and style will be blocked in the message. Typically, this option will affect email newsletters and promotional offers crafted using web technologies.

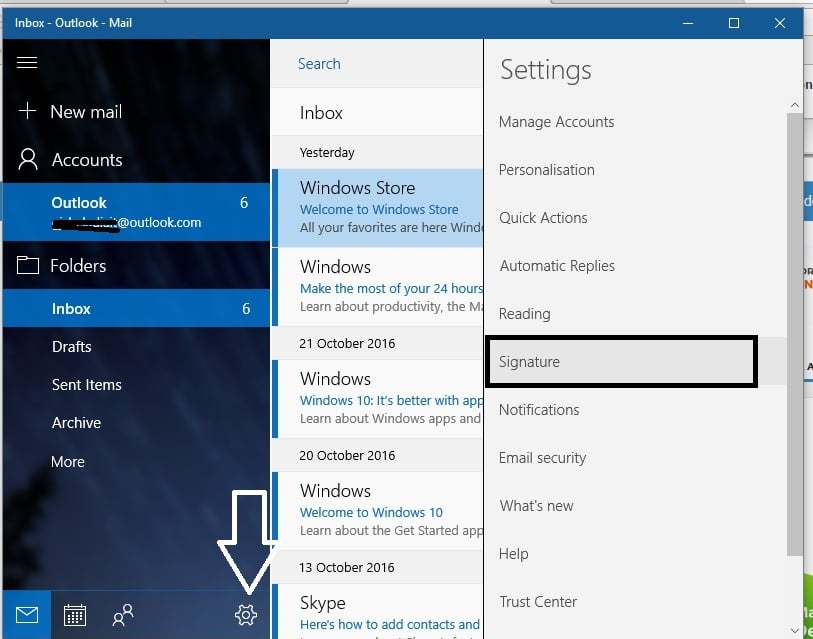
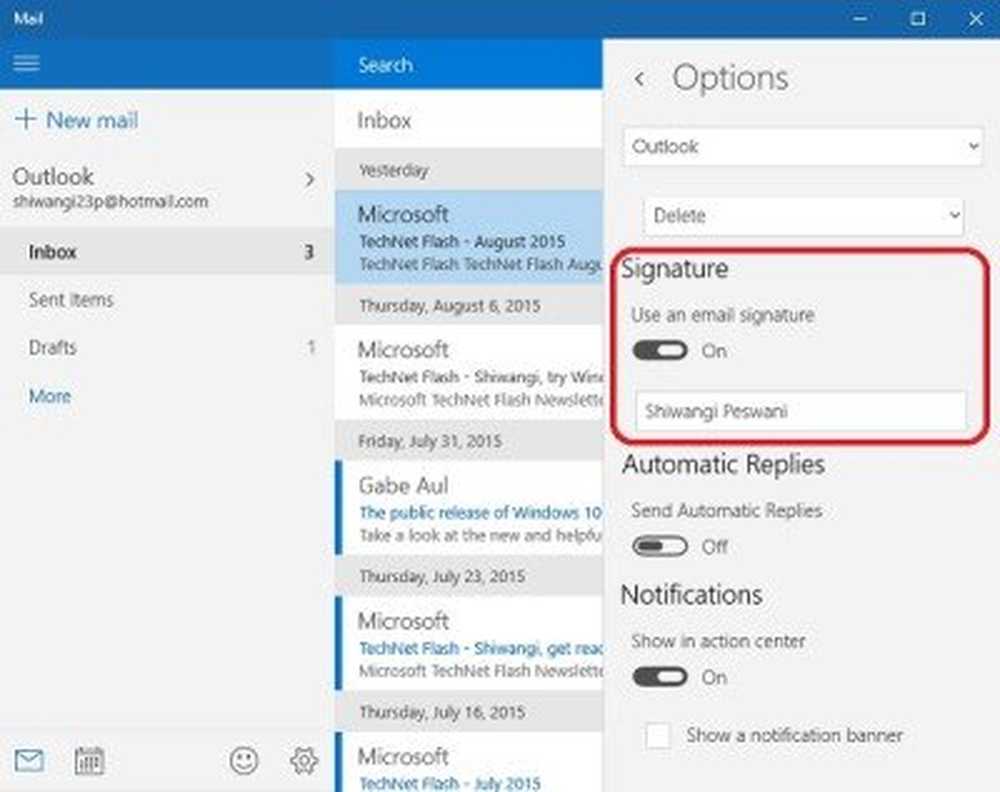
To create a custom signature, use these steps:
- Open the Mail app.
- Click the Settings (gear) button at the bottom of the left pane.
- Select the Signature option.
- Select the account to apply the signature or check the Apply to all accounts option.
- Turn on the Use an email signature toggle switch.
- Compose the signature that you want to use.
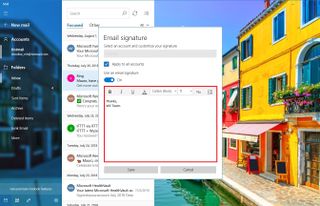
- Click the Save button.
Once you’ve completed the steps, your new custom signature will be included with every new message you send.
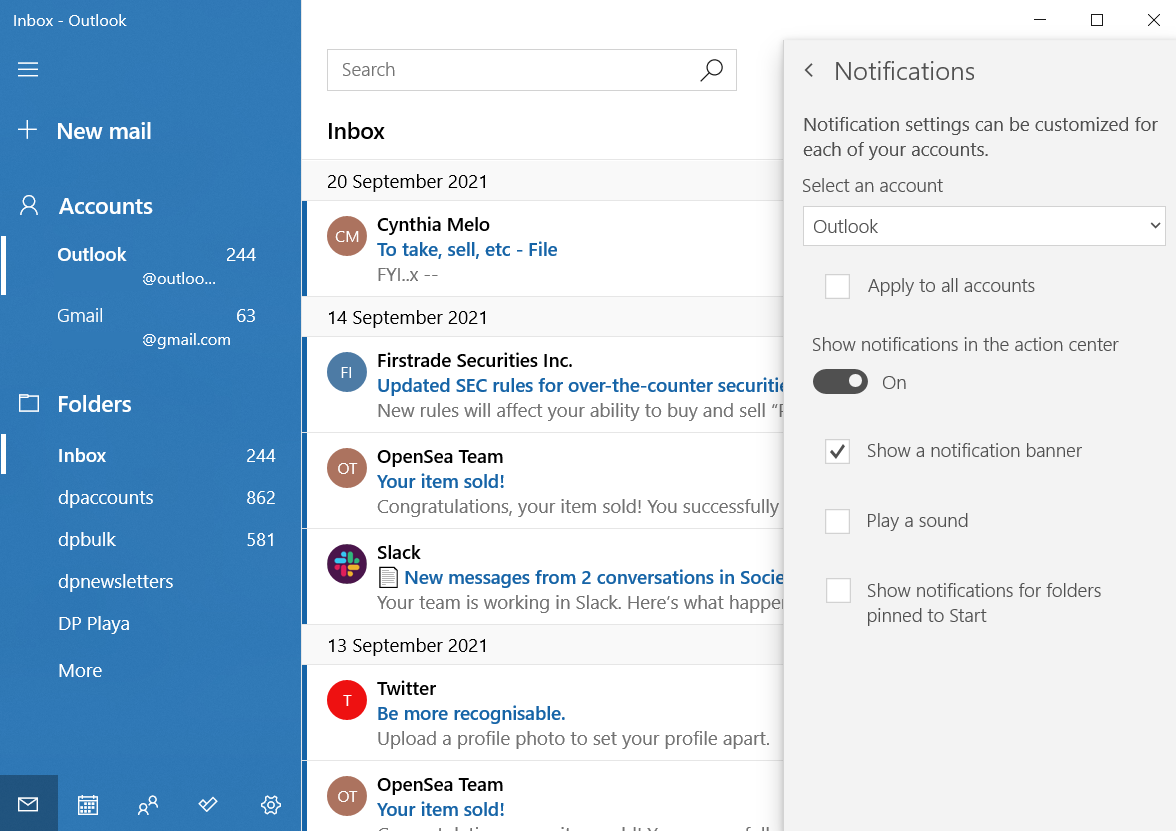
- Open the Mail app.
- Click the Settings (gear) button at the bottom of the left pane.
- Select the Notifications option.
- Select the account to adjust notifications or check the Apply to all accounts option.
- Turn on the Show notifications in the action center toggle switch.
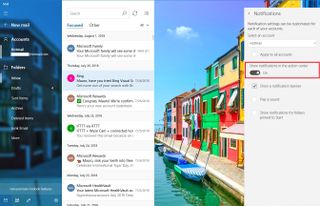
- Select the notifications settings that you want to use, including:
- Show a notification banner.
- Play a sound.
- Show notification for folders pinned to Start.
How to get Gmail on your Mac
There is also a Mail app built into macOS to get Gmail on your desktop with a Mac. It takes several steps to set up your Gmail account to work with the Mac Mail app:
- While on the Mail page, click ‘Add Account.’
- Choose ‘Google’ from the drop-down menu under ‘Choose a mail account provider.’
- Select ‘Continue’ and then click ‘Open Safari’ in the new box that will open.
- Enter your Gmail address and then select ‘Next.’
- You’ll then have to enter your password, select ‘Next,’ and enter the code you receive if you use two-factor authentication, and select ‘Next’ again.
- Select ‘Allow’ for the permissions.
- You can then also sync notes, contact and calendars in addition to your Gmail account.
- Your Gmail account will now appear in the left-hand sidebar of the Mail app under ‘Mailboxes.’
What is the best desktop email client for Gmail?
Downloading Shift is the best way to get Gmail on your desktop. Shift is the easiest way to get a desktop app for Gmail since you don’t have to configure anything in Gmail before adding your Gmail account to Shift. It only takes a few quick steps to add a Gmail account to Shift:
- Click on the ‘+’ at the bottom of the left-hand sidebar.
- Click on ‘Add Account’ from the options that appear.
- Type in your Gmail account address.
- Click ‘Add’ and then ‘Done.’
Once you’ve added your Gmail account to Shift, your profile picture for your account will appear in the top left-hand corner in the sidebar. All of the Google services you use will also appear in the top right-hand corner of the top bar in Shift.
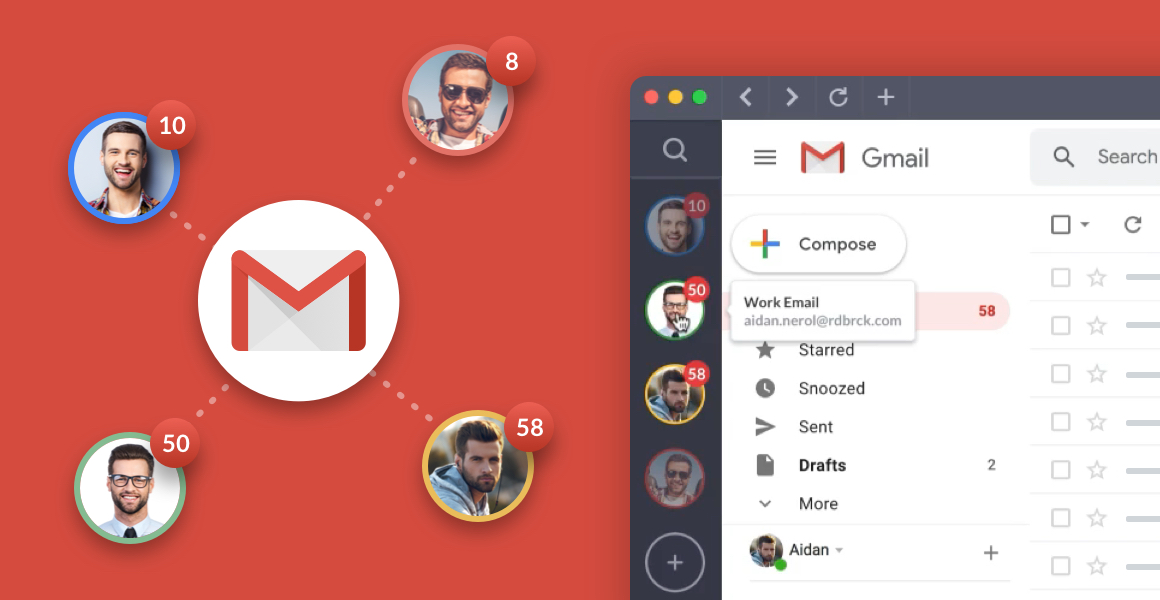
Using Shift as a desktop add for Gmail not only makes it easier to access your Gmail account, but it also makes it easier to manage multiple Gmail accounts. With Shift, you can add multiple Gmail accounts and then toggle between them without having to log in and out or set up forwarding between Gmail accounts. This will make all of your Gmail inboxes less cluttered since you won’t have multiple Gmail accounts being forwarded to one account. One tip to make it easier to navigate between multiple Gmail accounts in Shift is to make sure all of your accounts have distinct profile pictures so you can tell them apart at-a-glance.
Related Article: How to Manage Multiple Gmail Accounts
Вопрос 3: как дополнительно можно защитить свой аккаунт?
В том случае, если вы боитесь, что ваш аккаунт может быть взломан (или уже подобный опыт имеется), самое лучшее решение для обеспечения дополнительной безопасности – настройка двухэтапной аутентификации.
Суть данного метода заключается в том, что в процессе авторизации, помимо пароля, вам потребуется указать уникальный одноразовый код, который придет на специальное приложение на вашем мобильном устройстве. Подобный способ защиты аккаунта является наиболее действенным, а также продолжает успешно внедряться многими сервисами, где безопасность пользователей превыше всего.
Вопрос 4: как включить двухэтапную аутентификацию?
-
Если к вашему почтовому аккаунту был привязан номер мобильного телефона, для доступа к дальнейшему разделу вам потребуется подтвердить свою личность, приняв смс-сообщение и указав в соответствующей графе проверочный код.
-
На экране отобразится окно, в котором вам понадобится щелкнуть по кнопке «Настроить сейчас».
-
Выберите мобильное устройство, на которое может быть установлено специальное авторизационнное приложение от Microsoft.
-
На странице будет приведена ссылка на загрузку приложения, которое вам, соответственно, потребуется установить на свой гаджет.
- Запустите приложение, выполните в нем настройку, а затем вернитесь к браузеру и нажмите кнопку «Далее» для продолжения включения аутентификации.
- Собственно, на этом настройка аутентификации завершена. Единственный нюанс – для входа в почту с любого устройства вам всегда придется иметь под рукой свой смартфон с установленным приложением и активным доступом к сети, но для многих пользователей сегодня это не проблема.
Генератор писем
Мы оставим вам кое-что немного другое. позволяет вам Генератор писем Создавайте фальшивые сообщения, используя темы и ключевые слова по вашему выбору.
Сервис — идеальное приложение для использования, когда вы не знаете, что написать в фальшивом письме. Соедините это приложение с одним из фальшивых почтовых сервисов, которые мы уже обсуждали, и у вас в руках будет выигрышная шутка.
Доступные темы включают трудоустройство, отношения, аренду квартиры и даже тексты песен.
Генератор писем полностью бесплатен, и нет никаких ограничений на количество букв, которые вы можете создать.
How to get Gmail on your PC
One other option is to download Outlook and then sync your Gmail account with Outlook. The process to sync your Gmail account with Outlook involves two main steps. First, you have set up IMAP in Gmail. Second, you have to add your Gmail account in Outlook. If you skip the first step, you won’t be able to sync your Gmail account to your Outlook account.
Set up IMAP in Gmail:
- In Gmail, click on the ‘’ icon in the top right-hand corner.
- Click on ‘Settings’ in the drop-down menu.
- Click on ‘Forwarding and POP/IMAP.’
- Under ‘IMAP access’ choose ‘Enable IMAP.’
- Don’t forget to click on ‘Save Changes’ at the bottom of the page.
Add your Gmail account in Outlook:
- In Outlook, click on ‘File.’
- Choose ‘Add Account.’
- Add your Gmail account address in the window that opens and click ‘Connect.’
- Type in your Gmail password and click ‘Connect.’